![[FIXED] Content Warning Keeps Crashing On PC - (12 Solutions)](https://gamescopes.com/wp-content/uploads/2024/04/Content-Warning-Keeps-Crashing-On-PC-Featured.webp)

If Content Warning keeps crashing on PC, keep reading further!
Navigation Table
Toggle
The unexplained crashing of Content Warning is often associated with damaged or corrupted installation files. We can uncover the source of the problem through expert troubleshooting tips and techniques that will solve the Content Warning crashing in less than 5 minutes!
If Content Warning is crashing periodically on your PC, verify the file integrity through Steam and update the version of the graphic drivers. If the fault persists, adjust WIndows’s pagefile size, reinstall the game, and update DirectX and C++.
For a detailed solutions walkthrough, stay for the rest of the guide!
Why is Content Warning Crashing On My PC?
Here’s why Content Warning keeps crashing on your PC:
- There’s a permission issue with Content Warning.
- Your PC’s system’s CPU resources are insufficient.
- There’s a high utilization of WIndows’s background.
- The directory files of Content Warning are corrupted.
- An issue with the DirectX or the C++ redistributables.
Content Warning Keeps Crashing On PC - Easy Fix!
Quick Tip: Follow the steps consecutively!
1. Run the Game as an Administrator
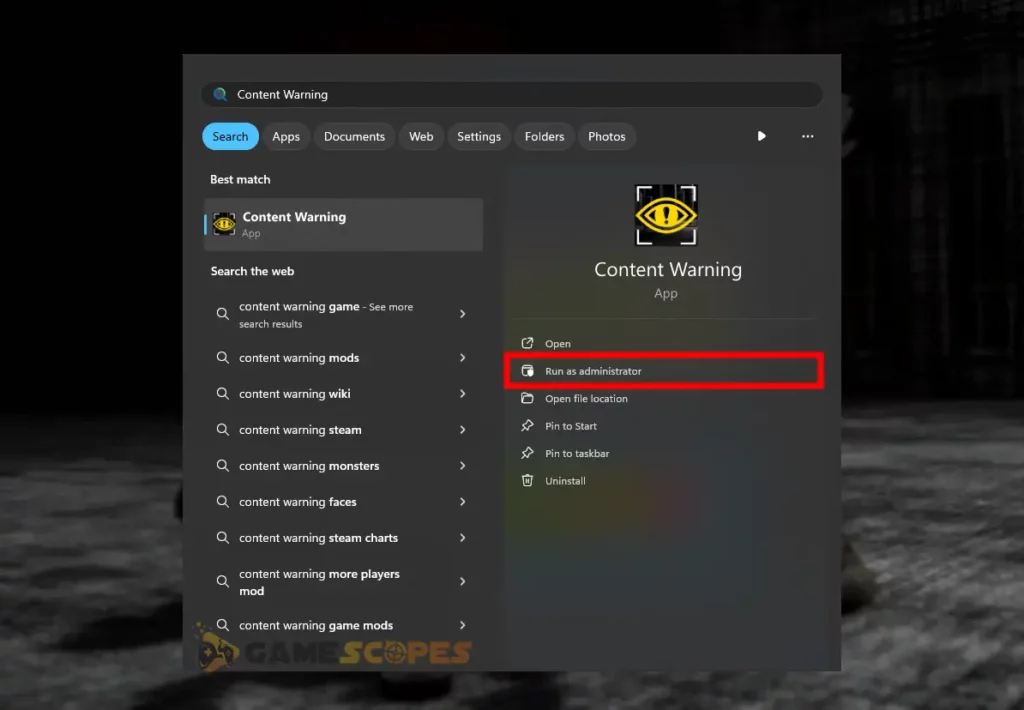
You can solve crashing issues with Content Warning by launching the game as an administrator on your system. There could be a missing dependency or a permission issue, preventing Content Warning from launching on your system or causing it to crash repeatedly.
- Access the Windows Start menu and type “Content Warning.”
- Once Content Warning shows up in the results, right-click it.
- Click on the “Run as Administrator” option from the drop-down.
- Next, confirm the Windows prompt that will appear on your screen.
- Wait until Content Warning is launched as administrator by Windows.
Tip: Ensure Content Warning’s publisher and firewall settings match before confirming the prompt!
2. Compare the System Requirements
Your PC’s system resources may be insufficient to run Content Warning smoothly and that could be the reason why the game is crashing. The next step is to compare your PC’s system resources with the minimal and optimal requirements to run CW optimally and see if the game is compatible.
Minimum | Recommended |
Windows 10 64-bit or newer | Windows 10 64-bit or newer |
AMD R9 380 or NVidia GeForce GTX 1050 | AMD RX 470 or NVidia GeForce GTX 1060 |
AMD FX-4300 or Intel Core i5 2.5GHz | AMD Ryzen 5 1600 or Intel Core i5 3.0 GHz |
8GB | 16GB |
4GB | 6GB |
Tip: Try the only tool Can You Run It, which uses “.exe” file to automatically scan your system and tell you whether Content Warning is compatible or not.
3. Verify Content Warning’s Game Files
You can address issues with Content Warning by verifying the game’s file integrity through the Steam launcher. The file integrity check is especially helpful against issues with Content Warning’s game files, damage, or corruption.
Here’s how to verify Content Warning’s game files in easy steps:
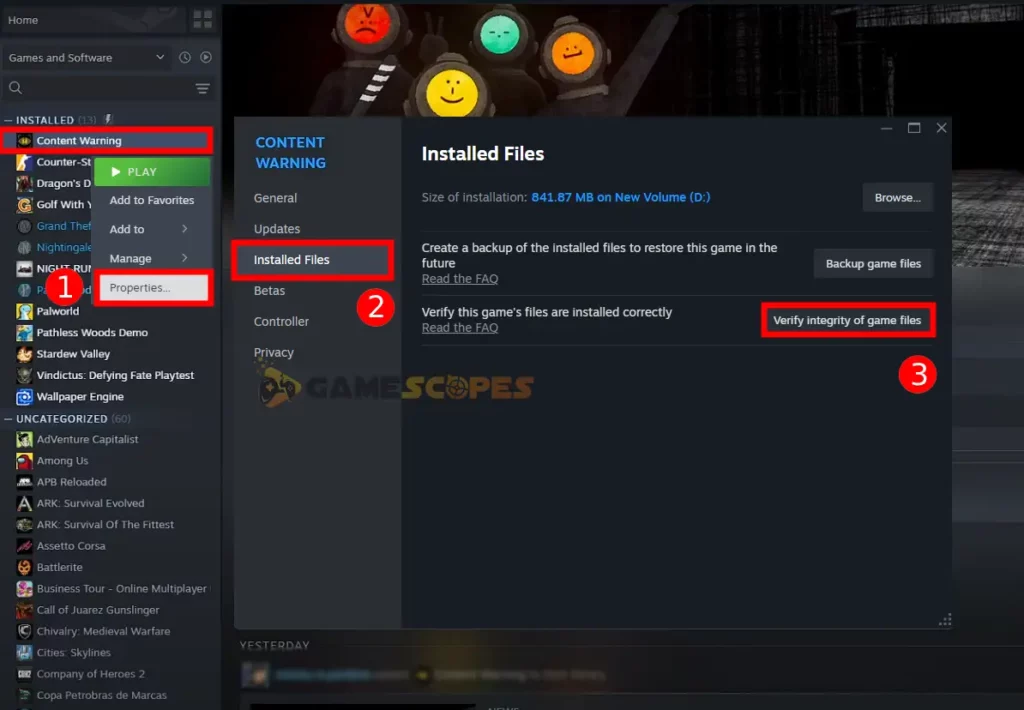
- Open the Steam launcher on your PC and go to “Library.”
- Use the search field or manually locate Content Warning.
- Right-click on the game’s banner and select “Properties.”
- Choose “Local Files” from the left-hand panel of the menu.
- Click on the “Verify integrity of game files” menu option.
- After that, wait until the file check is finished successfully.
Based on whether Steam has detected corrupted or damaged game files, the check could last for up to 2–3 minutes. Do not close the progress Window, exit Steam, or reboot/power off your PC before the inspection is finished successfully.
Tip: You should re-open the Steam launcher after the integrity check has finished!
4. Reduce the PC’s Background Utilization
You can address issues with Content Warning by reducing the background resource utilization of your PC. The more apps are opened in the background, the fewer resources will be left for Content Warning to utilize, low-in-game fps, underperformance, or persisting crashes.
Here’s how to reduce the background utilization of your PC in easy steps:
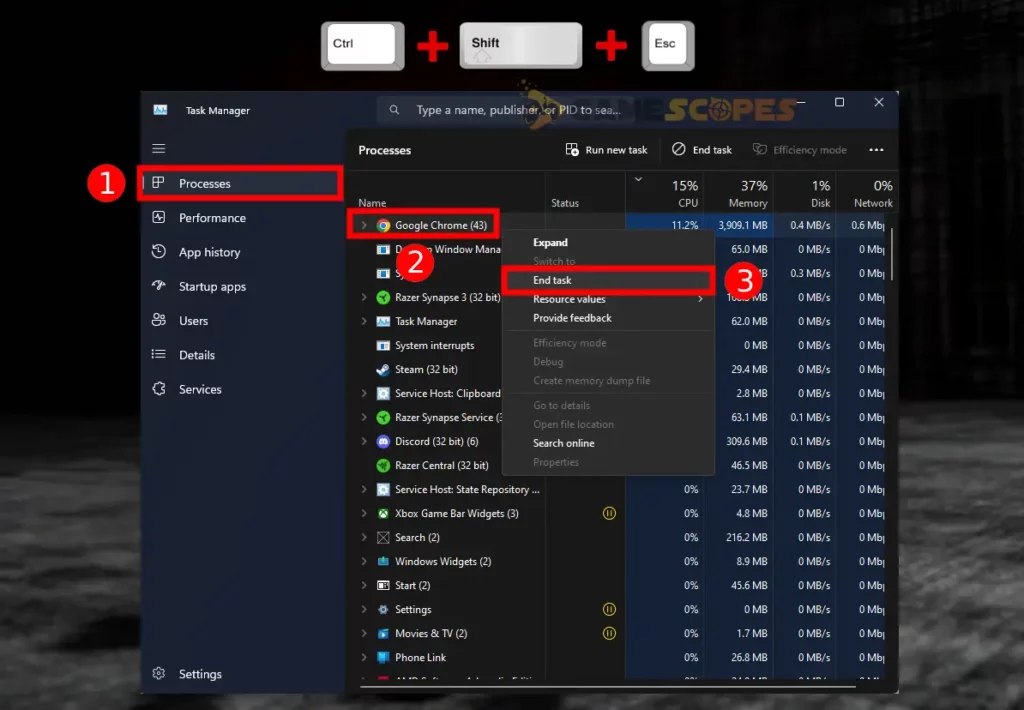
- Access the Task Manager on your Windows (shortcut: Ctrl + Shift + Esc.)
- Next, click on “CPU” at the top right to display the most demanding apps.
- Right-click on an application beside Content Warning and click “End Task.”
- Click on the “Memory” header to display the most memory-demanding apps.
- Right-click on one of the applications at the top and then select “End Task.”
- Optional: Repeat for all of the launched CPU or memory-demanding apps.
Tip: Browsers and other games in particular can be extremely CPU or memory-demanding!
5. Set OS Power Plan to “High Performance”
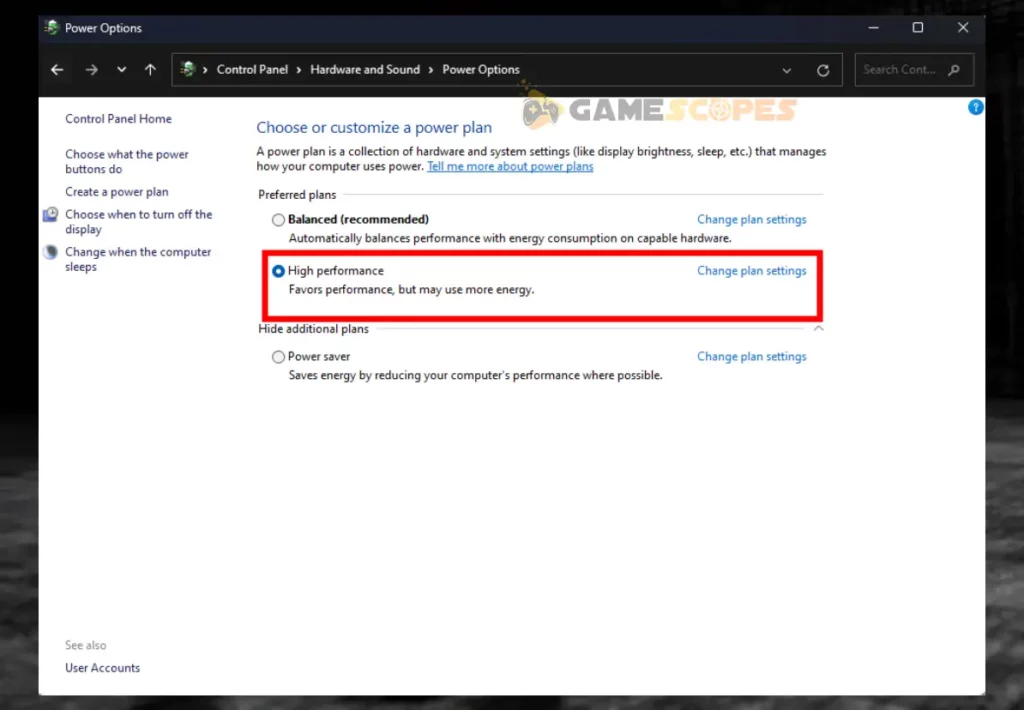
Setting Windows’s power plan to “High Performance” causes the system to allow third-party applications and services to utilize more memory storage and CPU resources. However, keep in mind that this feature is power-demanding, so ensure the PC’s power supply is compliant.
Here’s how to adjust your Windows’s power plan to “High Performance:”
- Select “Start” or press on the “Windows” keyboard button.
- Type “Control Panel” and press enter to access the page.
- Next, navigate to “Hardware and Sound” from the menu.
- Head to the “Power Options” and locate “Preferred plans.”
- Tick the “High Performance” option for your specific CPU.
Note: Based on your hardware, the power options and preferred plans will be different!
6. Upload the Latest Version of DirectX
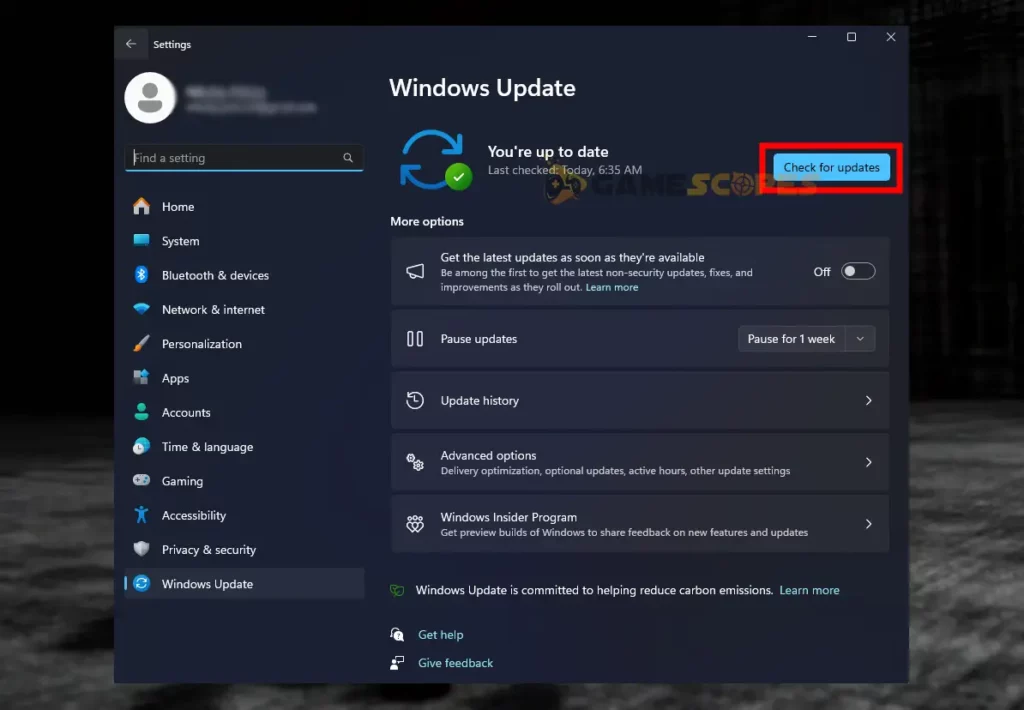
The “Windows Update” tab on Windows 11 automatically scans and downloads any recent DirectX update, so you won’t have to do it manually anymore. This method will also update your Windows version, which could be causing Content Warning crashes.
Here’s how to update the DirectX’s version on your Windows PC:
- First, select “Start” and type “Windows Update” in the field.
- Press enter to access the tab and click “Check for Updates.”
- Tap on “Install” to install all queued updates and versions.
Separate updates for different Windows services will be displayed right after pressing the “Install” button. You must wait until all services are updated before the Windows OS also starts updating.
Note: Your PC requires a stable internet connection to download the updates before installing them!
7. Deactivate Content Warning “V-Sync”
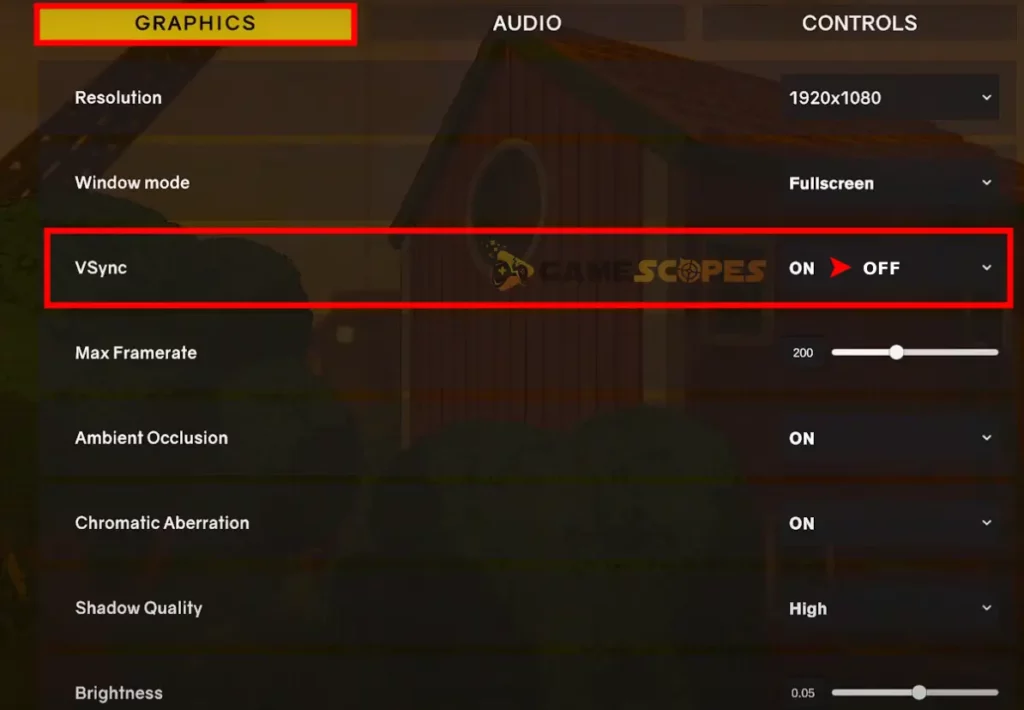
You can optimize the performance of Content Warning by enabling the Vertical Sync option within the graphics menu. The “VSync” is a graphics technology designed to sync the frame rate of the game with the monitor’s refresh rate, which may cause graphical glitches or screen tearing.
Here’s how to set Content Warning’s Vertical Sync to “OFF” within the settings:
- Launch Content Warning and go to pause menu → “Settings.”
- Click on the “GRAPHICS” header at the top, next to “AUDIO.”
- After that, scroll down and find “VSync” under “Window mode.”
- Press on the drop-down menu on the right part of the screen.
- Choose the “OFF” setting for the VSync to disable it entirely.
- Optional: Relaunch Content Warning and determine if it crashes.
Note: The VSync is strongly recommended if the game is underperforming or runs at low frames!
8. Allow the Game Through the Firewall
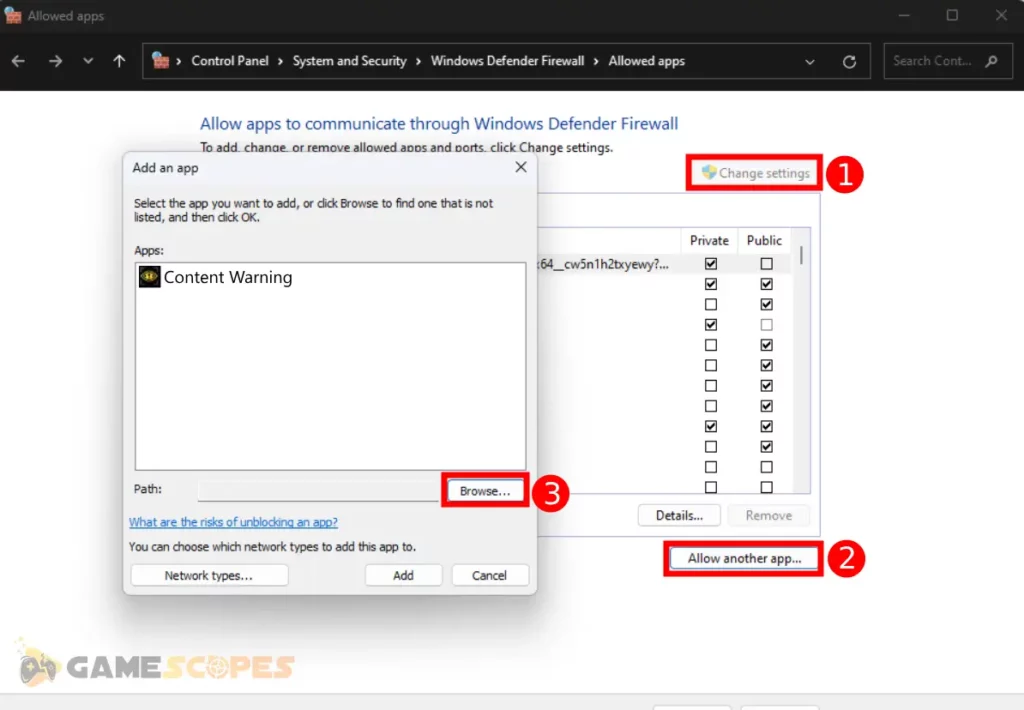
Content Warning could be crashing because it has not been granted administrator privileges through the Windows firewall. If the system has failed to verify the publisher of the Steam product, you must manually allow the game through in order to launch it on your PC.
Here’s how to manually allow games through the Windows firewall:
- In the Start menu, type “Allow an app through Windows Firewall.”
- Press “enter,” select “Change Settings” and confirm the prompt.
- Click on “Allow another app”, then “Browse” to open file explorer.
- Go to the Content Warning folder, and select the game’s launher.
9. Update Windows's C++ Redistributables
If Content Warning is still underperforming or crashes periodically, there could be a newer update available for the system’s C++ redistributables. The Microsft runtime libraries are used by many games and installed applications, so updating them might solve Content Warning’s crashing.
Follow these instructions to update the C++ redistributables of your system:
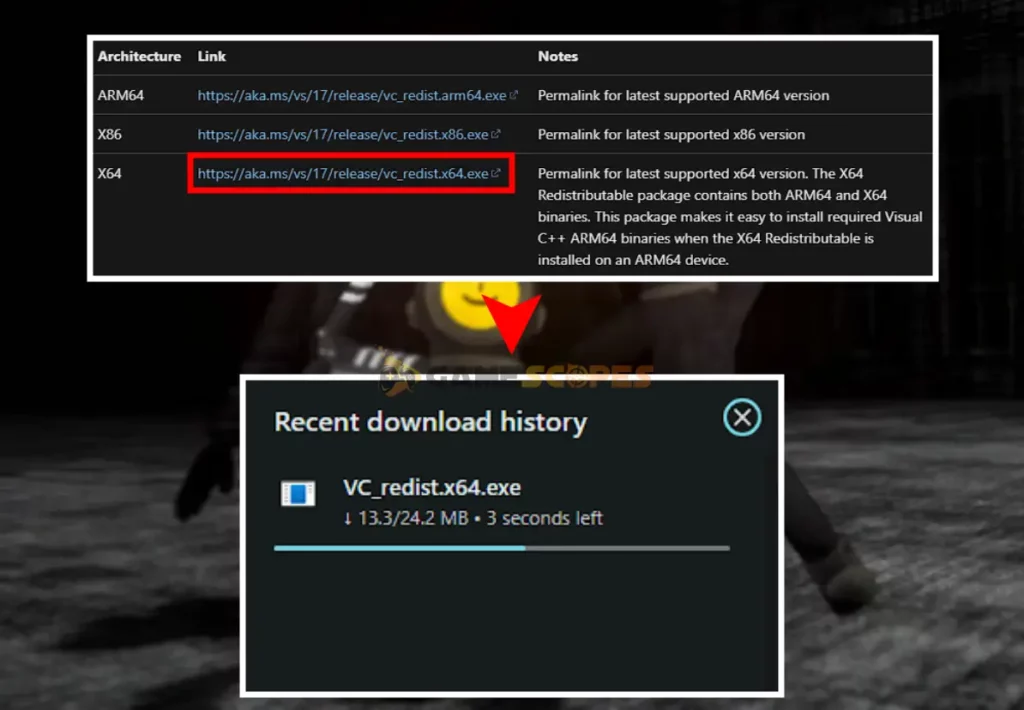
- Navigate to Microsoft’s C++ Downloads page on your computer.
- Scroll down to “Latest Microsoft Visual C++” redistributable version.
- Click on the “ARM64” or “X64” download link next to “Architecture.”
- Next, wait until the “.exe” file is successfully download and launch it.
- Finally, follow the on-screen prompts to apply the latest C++ version.
Notice: The update will last based on your PC’s performance!
10. Reinstall Content Warning From the PC
If Content Warning crashing on startup or upon performing a specific in-game action, you should reinstall the game’s directory in case of any faults. Steam’s file integrity checker may have failed to detect corruption of the game files due to a recent update or failed installation.
Here’s how to reinstall Content Warning on your PC in easy steps:
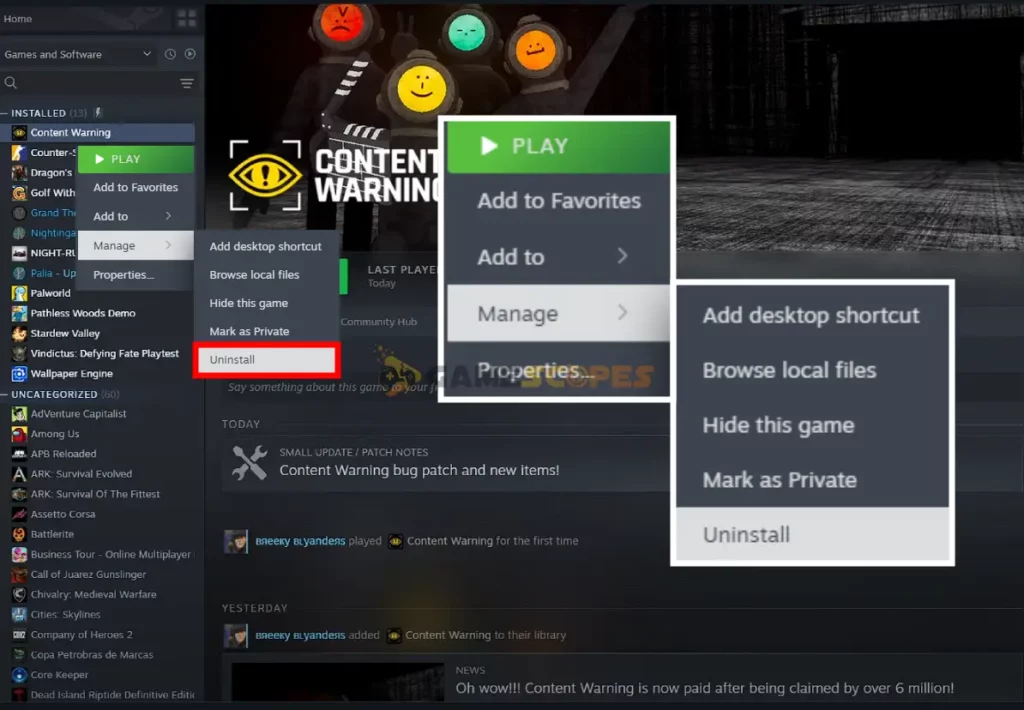
- Access the Steam launcher on your PC and go to “Library.”
- Right-click on Content Warning’s banner from the menu.
- Hover over “Manage” and click on the “Uninstall” option.
- Next, wait until Content Warning is successfully removed.
- Tap on the blue “Install” button after pressing on the game.
Reinstalling Content Warning requires an internet connection to your PC. Verify that the device has established a strong and secure connection over Wi-Fi or Ethernet!
Note: Existing issues with the internet connection may cause Content Warning voice chat issues!
11. Adjust Windows’s Pagefile Size
You can achieve greater performance within Content Warning and resolve unwanted crashes by tweaking Windows’s pagefile size settings. It is an optimal way to re-distribute the available virtual memory of the system, as it plays a big role in the caching of available RAM.
Here’s how to tweak the pagefile size settings of your Windows PC:
- Open the “Start” menu and search “system settings” below.
- After that, navigate to “View Advanced System Settings.”
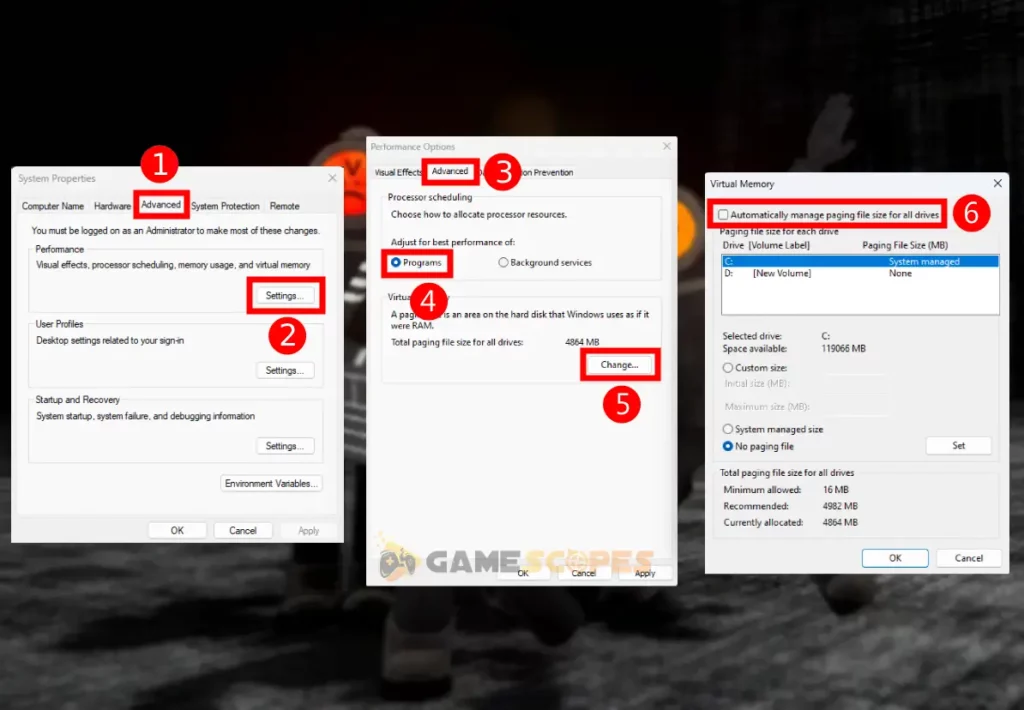
- Once within “System Properties,” tap the “Advanced” tab.
- Click on “Settings” and again go to the “Advanced” pane.
- Under “Adjust for best performance of,” check “Programs.”
- Then click on the “Change” button to open Virtual Memory.
- Uncheck “Automatically manage paging file size” below.
12. Move Content Warning to a Different Drive
Whenever Content Warning keeps crashing on PC, you should move the game’s installation directory to a different drive added to your system. Regardless of whether it is an HDD or SDD, you can test-launch the game through any of the drives, as long as all of the necessary files are present.
Here’s how to move Content Warning to a different drive through Steam:
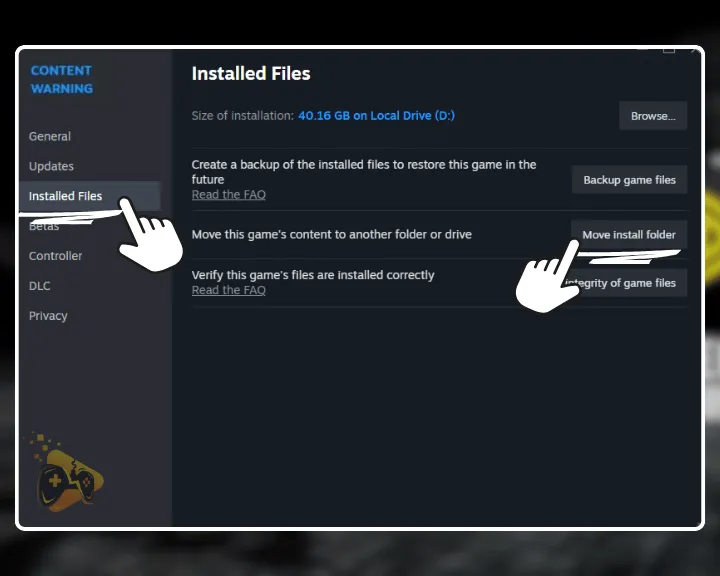
- Access the Steam launcher on your PC and go to “Library.”
- Right-click on Content Warning from the game side menu.
- Click on “Installed Files” and select “Move Install Folder.”
- Specify a Steam library on another drive to move the game.
Tip: Details on how to access Content Warning’s local files can be found in solution #3!
How to Create Steam Library On a New Drive?
Each of your PC’s drivers can have a single Steam library, that stores all Steam games installed on that specific drive. If you wish to move Content Warning to a drive that does not have a library yet, here’s how to create one:
- Open the Steam launcher and click “Settings” at the top.
- Navigate to “Storage” from the Steam menu on the side.
- Next, click on “Add New Drive” and follow the instructions.
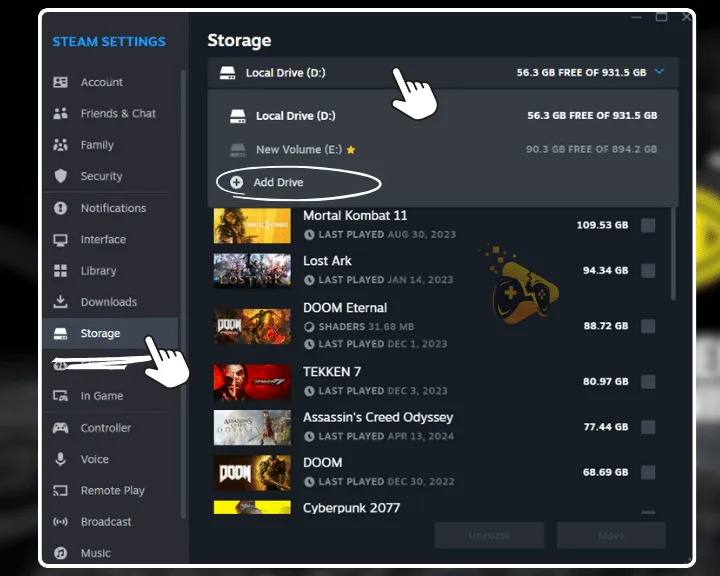
Note: You will be unable to overwrite a Steam library to a drive with an existing one!
Final Thoughts:
Whenever Content Warning keeps crashing on PC, launch the game as an administrator, ensure Content Warning is compatible with your system, and update Windows. If the fault persists, verify Content Warning’s files, adjust the Windows pagefile, and reinstall the game.
Related Articles:
- How to Fix Content Warning Voice Chat Not Working? – 9 Solutions
- How to Fix Content Warning Low FPS Issue? (Ultimate Guide)
- How to Fix The Outlast Trials Keeps Crashing On PC? (Quick Fix)
- How to Fix Dragon’s Dogma 2 Crashing? – 10 Solutions for PC
- How to Fix Last Epoch Keeps Crashing On PC – Instant Solutions
- Supermarket Simulator Crashing/Not Launching – 7 Instant Fixes
- Helldivers 2 Crashing on PC – Fixed in 9 Easy Solutions
- Palworld Keeps Crashing on PC – 11 Quick & Easy Solutions
- How to Fix Baldur’s Gate 3 Keeps Crashing – Easy Way to Fix
- Valorant Keeps Crashing on Startup – 9 Easy Solutions


![[Fixed] Helldivers 2 Failed to Join Game Lobby Error (7 Solutions)](https://gamescopes.com/wp-content/uploads/2024/05/Helldivers-failed-to-join-game-lobby-Featured-300x240.webp)