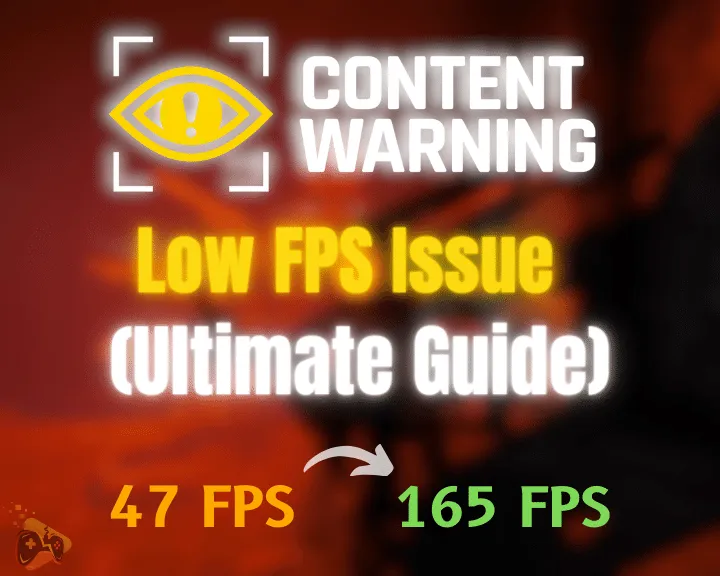
Many users have been struggling to improve the performance of Content Warning and deal with the reduced in-game framerates, even if their PC is well over the requirements.
The truth is Content Warning may still be missing some essential performance optimizations but there are easy workarounds to significantly improve the framerate in minutes!
So, let’s go through some of the techniques:
To improve Content Warning’s low FPS performance, switch up the game lobby, remove the BepInEx mod loader, and uninstall all mod packs. Next, reduce the graphic settings, disable the “Max Framerate” limiter, and reinstall the game.
We will go through all of the following solutions in detail, so keep reading further!
What Causes Low FPS On Content Warning?
Here’s what can degrade the FPS performance within Content Warning on PC:
An issue with the game lobby or connected players.
The “Max Framerate” feature is enabled and set low.
The graphic drivers of your PC’s GPU are outdated.
The graphic settings are too high for your computer.
Modded Content Warning files are causing problems.
There’s an issue with Content Warning’s game files.
This is what can potentially cause a significant reduction in Content Warning’s FPS performance. Keep reading further into the guide to explore expert solutions for the issue!
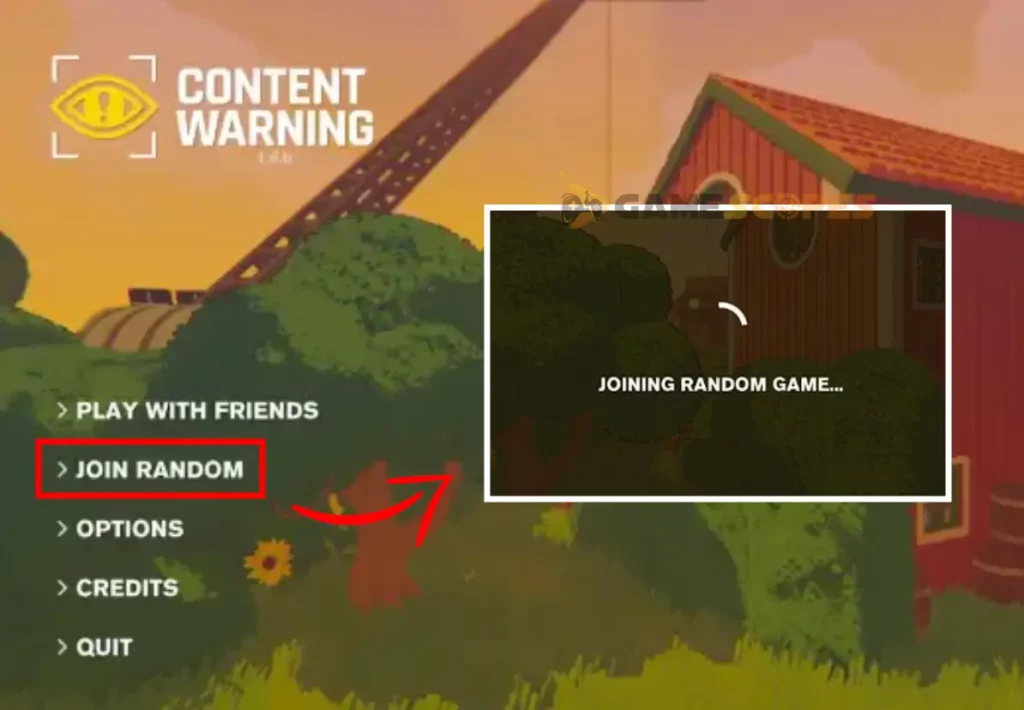
You should first determine whether the game itself causes the unusually low FPS, your PC, or the lobby you have entered. Some player servers are particularly more laggy and underperforming compared to others, due to overloading with mods or bad hosting.
So, exit the current Content Warning game you have accessed and head back to the lobby. You can either use the “JOIN RANDOM” button or enter a friends lobby to determine if the low FPS persists.
Note: You should keep away from random lobbies while testing Content Warning’s FPS performance!
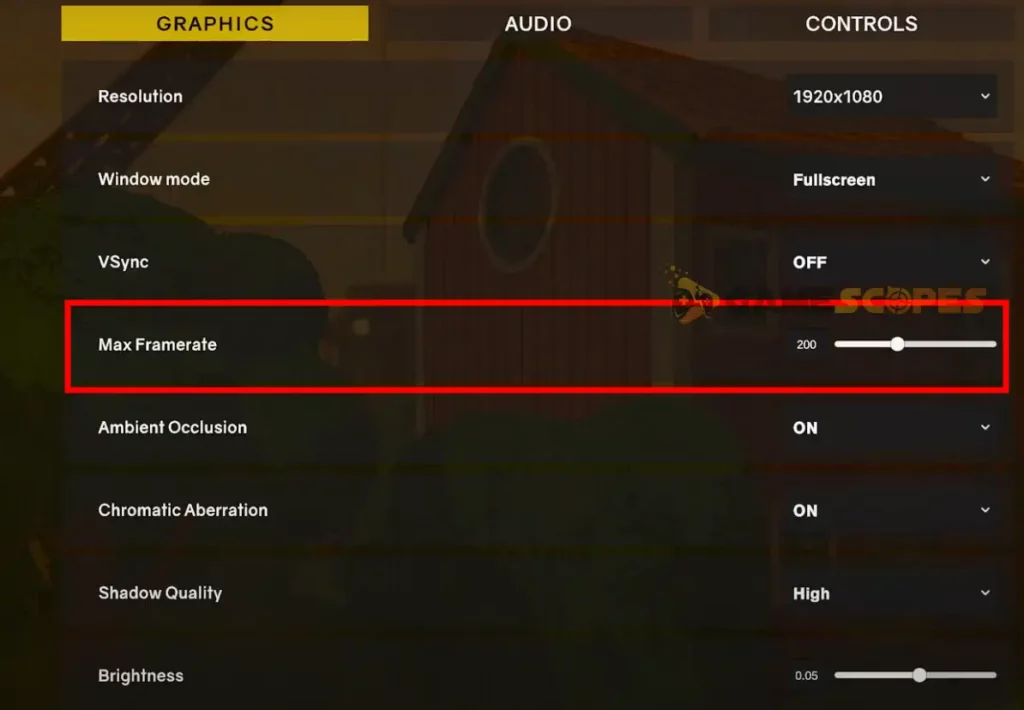
2. Adjust Content Warning’s FPS Limiter
You may have accidentally reduced the “Max Framerate” limiter within the settings of Content Warning, preventing the game from performing properly. You must ensure Content Warning’s output FPS has not been limited prior to adjusting any of the other graphic settings of the game.
Here’s how to check if Content Warning’s FPS limiter is set to a low value:
Navigate to the main menu of Content Warning on your PC.
Access the “Settings” menu and click “Graphics” on the left.
Go down and find the “Max Framerate” sliderdownwards.
Drag the slider towards the right to increase your FPS limit.
The minimum framerate limit you can set within Content Warning is “30” and the highest is “480.” You should always adjust the framerate limiter according to your monitor’s refresh rate for optimal performance.
Noe: If your monitor has a 144Hz refresh rate, the game won’t make any visual difference after 144 FPS in-game!
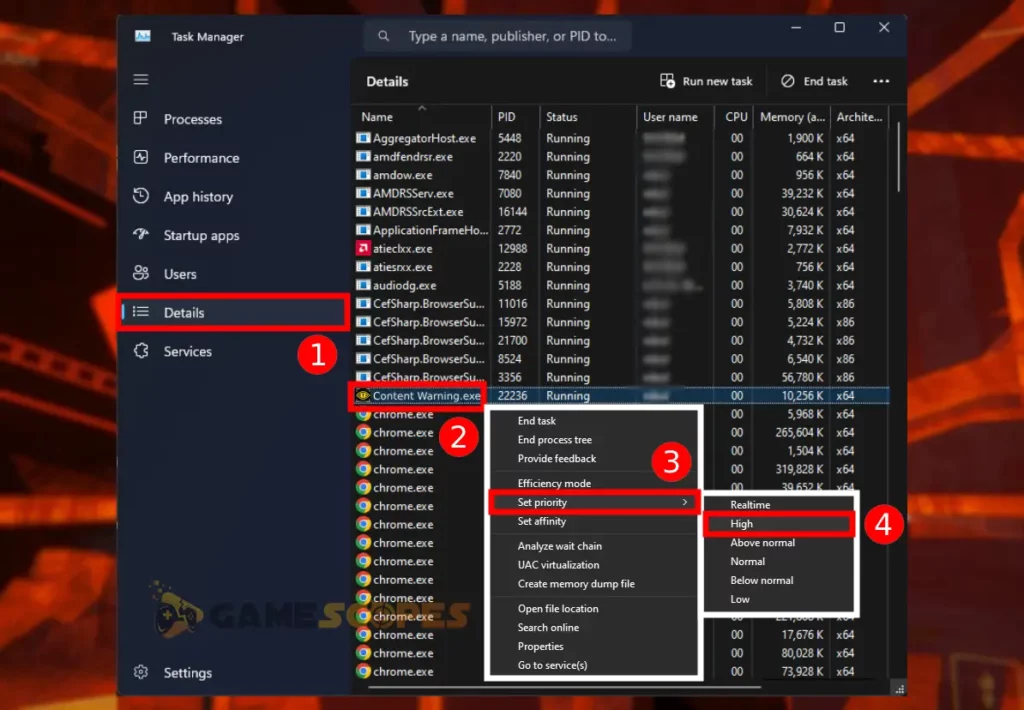
3. Change Content Warning’s System Priority
While launched, you will be able to prioritize Content Warning’s process for your Windows to achieve better performance and increase the FPS. After specifying Content Warning as a priority process, your system will allow the CPU to work at a higher frequencies and provide it with more power while the game is launched.
Note: Ensure Content Warning is launched before specifying ait as a priority!
Here’s how to set Content Warning as a priority for Windows:
Access the Task Manager on your Windows device (Ctrl + Shift + Esc).
Then, from the left side go to the “Details” tab to reveal task/processes.
Press “C” until Content Warning is highlighted within the task manager.
Right-click on your game and hover over the “Set Priority” menu option.
Set “High” from the new drop-down menu and close the task manager.
Alert: You have to set Content Warning as a priority after each launch!
4. Re-Adjust the Graphic Settings
The low Content Warning FPS could be a result of incorrectly configured in-game graphic settings.
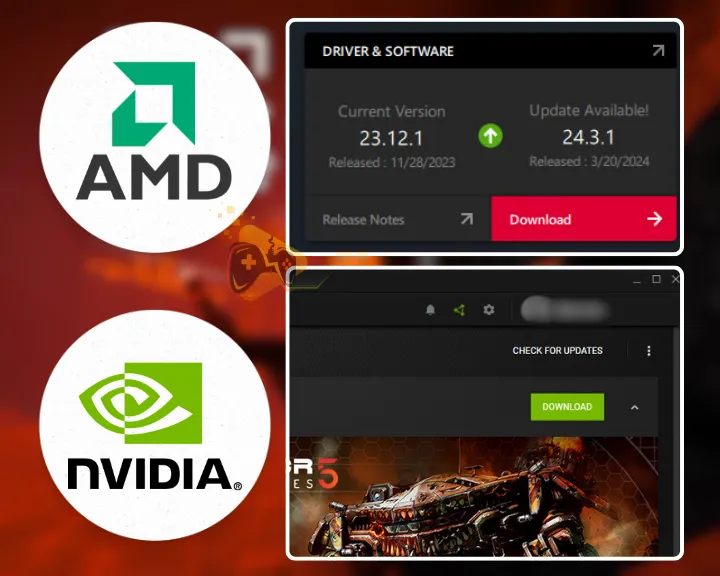
Whether you’re on AMD, NVidia, or an Intel-powered GPU, you must always upload the latest version available for the graphic drivers. This is especially crucial for gaming, as the most recent video card updates often fix synchronization issues between the monitor’s refresh rate and the FPS of games.
To access Content Warning’s graphic settings menu at “Settings” → “Graphics.”
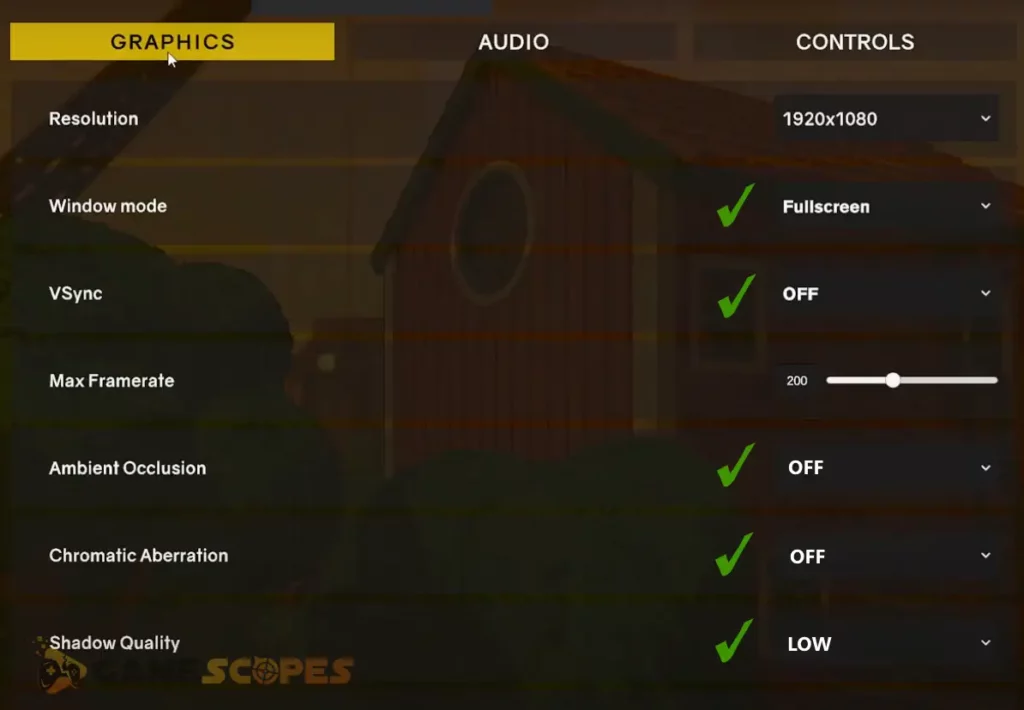
The Best Content Warning Settings: (Max FPS)
“Resolution” – (Set to your screen’s native resolution)
“Window Mode” – Set to “Fullscreen”
“VSync” – Set to “OFF”
“Max Framerate” Set to “60”
“Ambient Occlusion” – Set to “OFF”
“Chromatic Aberration” – Set to “OFF”
“Shadow Quality” – Set to “LOW”
“Brightness” – <User preference>
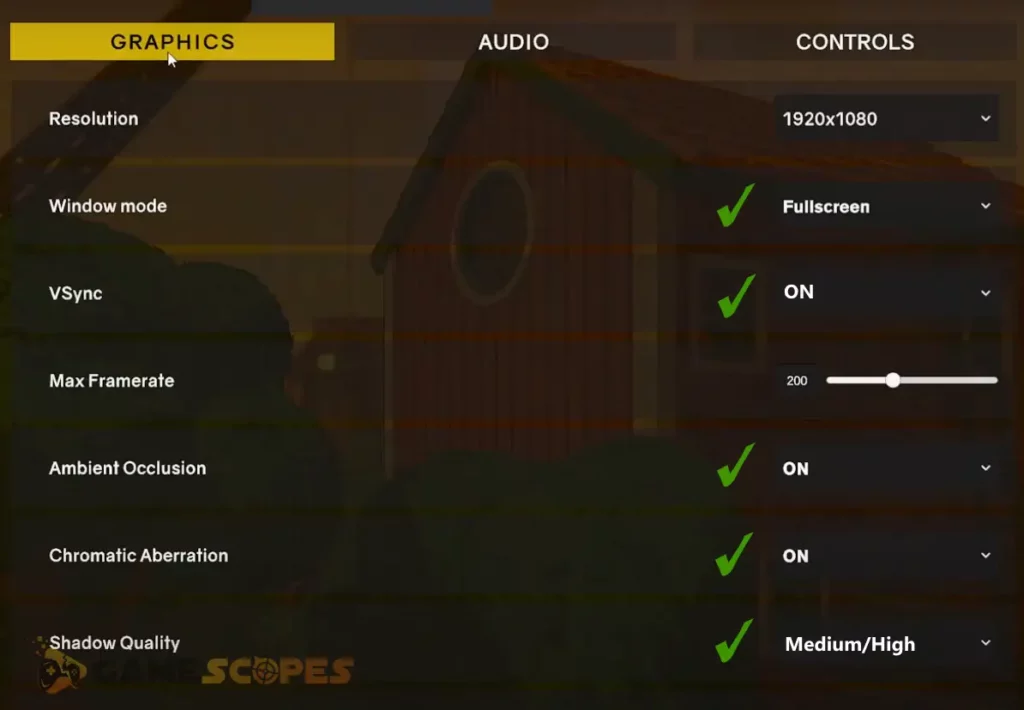
The Best Content Warning Settings: (Balanced)
“Resolution” – (Set to your screen’s native resolution)
“Window Mode” – Set to “Fullscreen”
“VSync” – Set to “ON”
“Max Framerate” – (Set to monitor refresh rate)
“Ambient Occlusion” – Set to “ON”
“Chromatic Aberration” – Set to “ON”
“Shadow Quality” – Set to “Medium” or “High”
“Brightness” – <User preference>
Note that incompatible graphic settings may cause Content Warning to freeze, underperform, or even crash repeatedlyon the system.
The settings must be optimized for the computer performance!
Pro Tip: The setting that causes the most FPS reduction is the “Shadow Quality.”
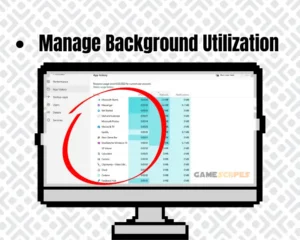
5. Lower the PC’s Resource Occupation
If most of your PC’s memory or CPU resources are occupied by other programs or applications, Content Warning’s performance may reduce significantly in terms of FPS. So, the next step is to reduce the background utilizationto increase Content Warning’s overall performance and FPS.
Follow these instructions to lower the resource occupation of your PC:
Open the Task Manager on your PC (keyboard shortcut: Ctrl + Shift + Esc).
Next, tap on the “CPU” header at the top part of the Task Manager prompt.
Right-click on the most demanding process after Content Warning’s tile.
Choose the “End Task” option from the drop-down menu of the process.
Click on the “Memory” header on the right of “CPU” and repeat the steps.
While Content Warning is not RAM-demanding, it can be particularly overloading for your CPU if not managed properly. It is recommended to persistently track the performance of your CPU and RAM while gaming to avoid high utilization and potential PC overheating.
Tip: You may require an external service to track the CPU’s temperature such as HWInfo.
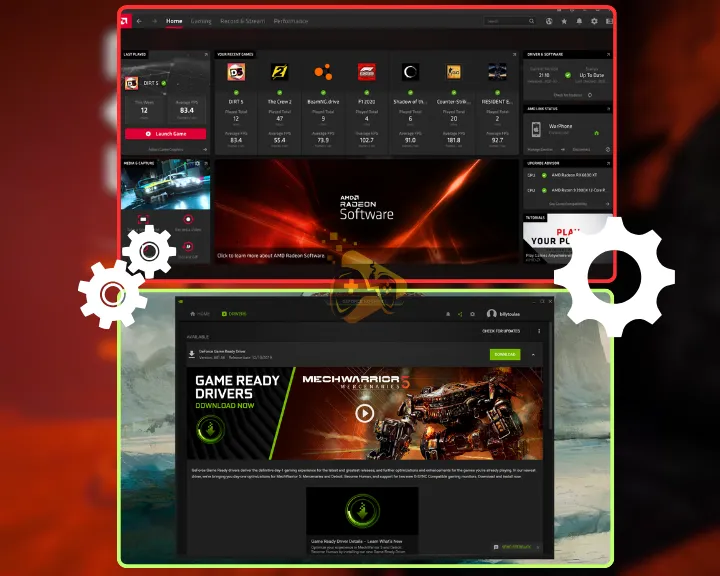
6. Update the System’s Graphic Drivers
Outdated GPU drivers are the primary reason why Content Warning is underperforming and produces low output FPS. The next step is to upload the latest graphic drivers available for your system and determine whether that will improve the performance of Content Warning on your PC.
How to Update NVidia Graphic Drivers?
Right-click on your desktop and select NVIDIA Control Panel.
Navigate to the “Help” menu and select the “Updates” button.
Follow the instructions to start and finalize the graphics update.
Note: You can also manually download and unpack the latest update through NVidia’s Drivers!
How to Update AMD Graphic Drivers?
Right-click anywhere on your desktop and click on “AMD Software.”
Next, wait until the control panel launches and navigate to “Home.”
Click on the “Check for Updates” button and wait for driver results.
If an update is available, click on “Apply Update” to start the process.
Note: You can manually download the latest video card driver update through AMD Drivers!
Download the latest driver software for your integrated Intel GPU.
Run the “.exe” file and follow the prompt instructions to finalize.
Notice: Your PC will have to restart right after the latest GPU drivers are uploaded!
7. Uninstall All Content Warning Mods
Heavier Content Warning mod packs may significantly impact the game’s performance and cause a heavy reduction of the in-game FPS. To determine if Content Warning will perform better without mods, the next step is to manually remove each custom file in the game’s installation directory.
First, let’s learn how to access Content Warning’s directory through Steam!
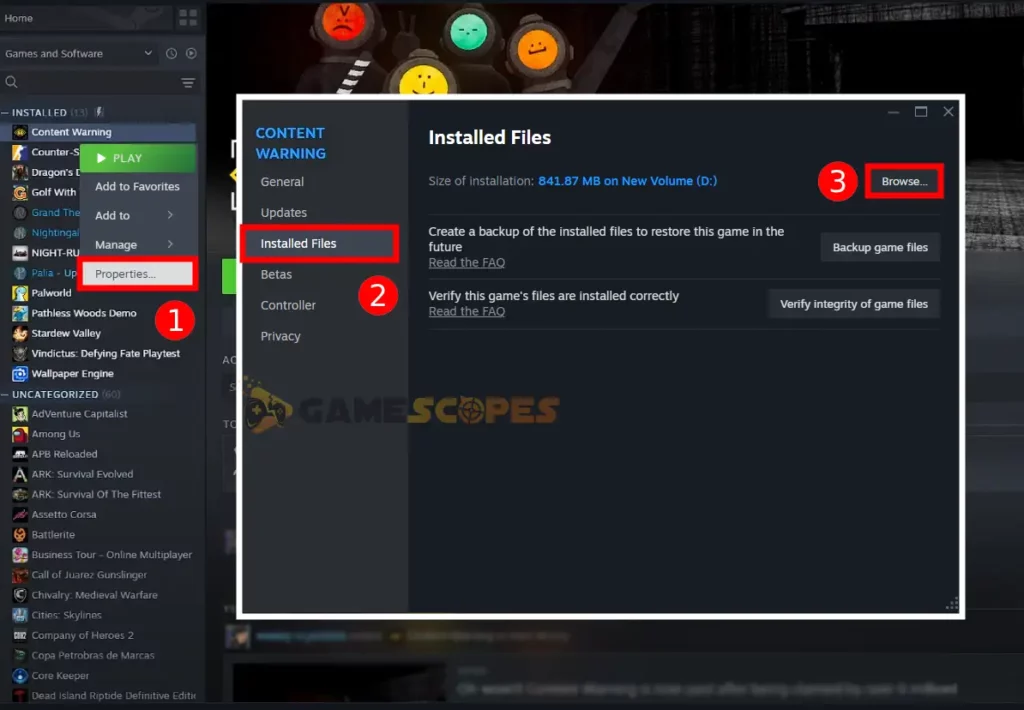
How to Access Content Warning Directory?
Access the Steam launcher on your PC.
Click on “Library” and scroll downwards.
Find “Content Warning” in the game list.
Next, right-click and press on “Properties”
Navigate to the “Installed Files” section.
Click on the “Browse…” button at the top.
How to Manually Uninstall Added Mods?
The BepInEx is a standard unity mod loader and is necessary for installing and unpacking Content Warning mods. The modder’s folder can be found within the default installation directory of the game and all mod files are under the “Plugin” folder.
Tip: You can also access Content Warning’s installation directory manually!
8. Tweak the GPU Control Panel Settings
Adjusting Content Warning’s performance and settings through the GPU driver’s interface may significantly improve the FPS and solve lagging or stuttering. You can apply custom presets, filters, and graphic settings and enable other options through the AMD or NVidia driver menu.
Let’s learn how to adjust Content Warning settings through the NVidia or AMD drivers!
Open the graphic driver control panel (AMD Adrenalin or NVidia Control Panel.)
From the “Recently Played” menu, select Content Warning and enter the settings.
Navigate to the “Custom” or “Tuning” tab at the top of the game’s settings menu.
Next, manually set and adjust Content Warning’s graphic settings to lower values.
You will be able to enable or disable features such as “Super Resolution” or overlock the GPU, particularly for Content Warning. You should take also take into consideration the overheating margin of your components and configure the game’s performance accordingly.
Note: While Content Warning is not as demanding, it could still highly utilize your components!
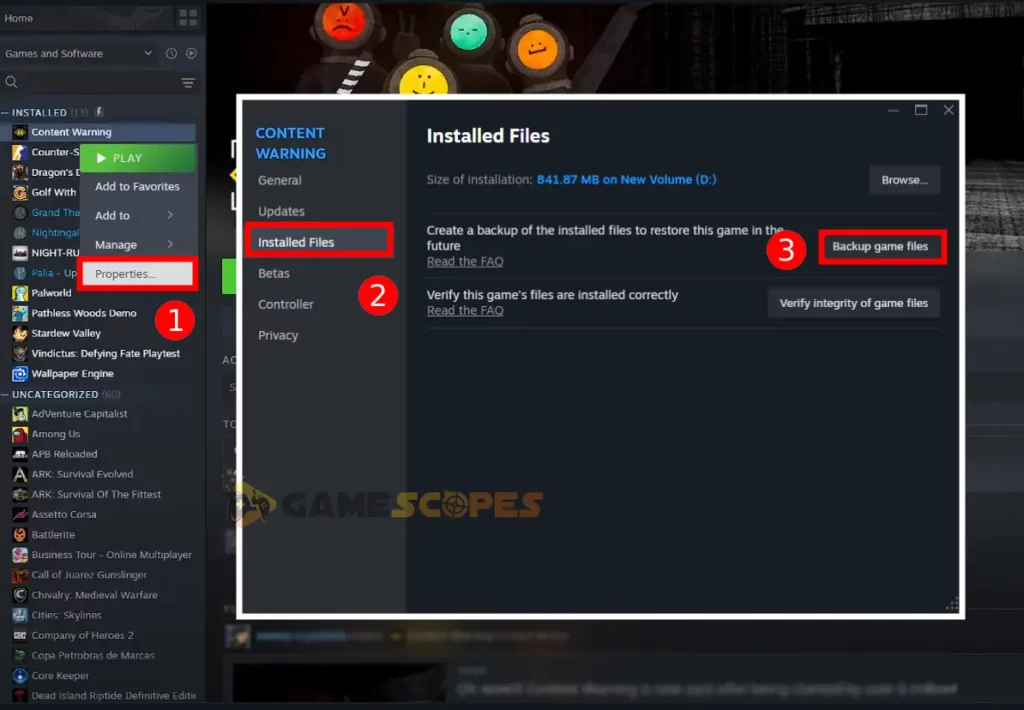
9. Backup and Reinstall Content Warning
You can eliminate potential issues with the logs or Content Warning’s integrity of files by reinstalling the gamefrom your system completely. Before the uninstallation, you should note that any custom modifications of the game’s files or installation directory will be erased permanently!
If you wish to save any of the modes, create a Steam or Local backup of the game files to re-apply them after the reinstallation.
How to Create Content Warning File Backup?
Open the Steam launcher on your computer and head to “Library.”
Right-click on Content Warning on the side and open “Properties.”
Select “Installed Files” from the menu and click “Backup game files.”
Choose a custom directory to create the backup of Content Warning.
Click on “Create Backup” and wait until Steam stores the game’s files.
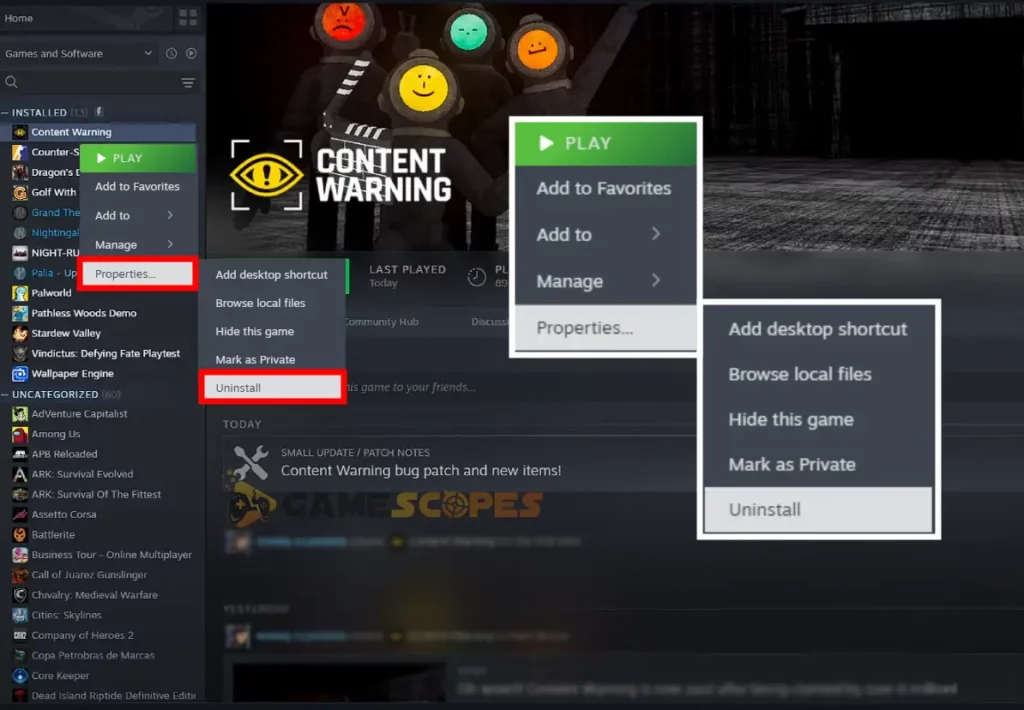
How to Reinstall Content Warning From PC?
Right-click on Content Warning from under the Steam library.
After that, hover the cursor over “Manage” and click “Uninstall.”
Next, confirm the game’s uninstallation and wait until it is removed.
After Content Warning is uninstalled, click on the blue “Install” button.
Specify a new installation folder for the game and start the download.
Optional: Re-apply the Content Warning backup you created earlier.
To solve the Content Warning low FPS issue, update your GPU’s drivers, switch up the game lobby, and install all local Content Warning mod packs. If the fault persists, reduce the background utilization and cleanly reinstall Content Warning.
Hey there, fellow gamers! I'm the wordsmith behind GameScopes.com with near a dacade of experience in games and troublehsooting gaming devices. I am here to share my true passion and help everyone in the gaming industry.