That’s why in this ultimate guide, we will go over everything that can prevent you from using the voice chat or hearing its participants.
If your Content Warning voice chat is not working, select your mic in-game, set the input on “Voice Detection” and boost the volume. If this doesn’t help, configure the Steam voice settings, and troubleshoot your Windows input.
If you’re facing other issues with Content Warning such as low FPS or crashing, don’t forget to check the in-depth steps from our dedicated guides.
Voice Chat Not Working Content Warning - Why?
Here’s everything that can prevent your Content Warning voice chat from working:
Your mic is not selected in-game.
Your mic is on “push to talk” only.
The in-game voice is too lowered.
Steam’s voice settings are wrong.
The PC doesn’t recognize the mic.
The mic is not your default input.
Your mic level and boost are low.
The game doesn’t have mic access.
We’re about to address each of these, so let’s jump in!
How to Fix Content Warning Voice Chat Not Working?
Tip: Follow the steps consecutively!
1. Select your In-Game Microphone
If your Content Warning voice chat is not working, the most common reason is that the game is not configured to use the correct input device. Said simply, the game allows you to select which of your input devices (microphones) to use, and if not selected, the microphone will not function.
Here’s how to set the correct microphone in Content Warning:
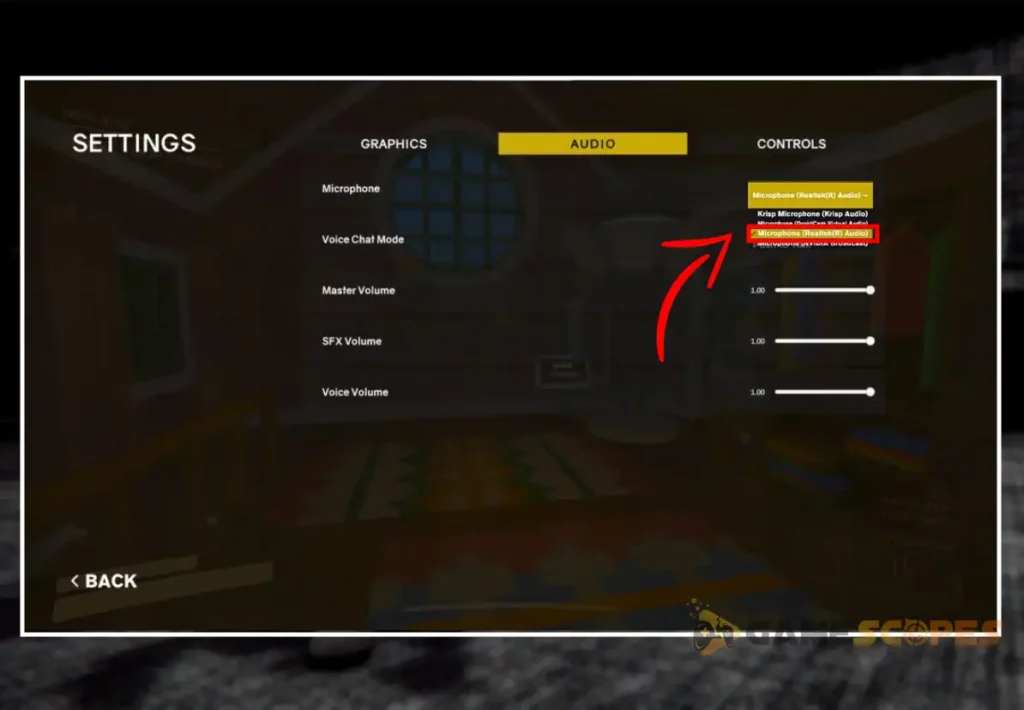
Open the game and head to “Settings.”
In the setting go to the “Audio” section.
Expand the “Microphone” drop-down.
Then, find and select your microphone.
If another input device has been selected, instead of the microphone you’re attempting to use for the Content Warning voice chat, that explains the issue.
If your microphone does not appear in the list, this means that the computer does not recognize the connected input device. So, you need to ensure that your PC recognizes the microphone, so jump to step #4, to correct any input recognition problems.
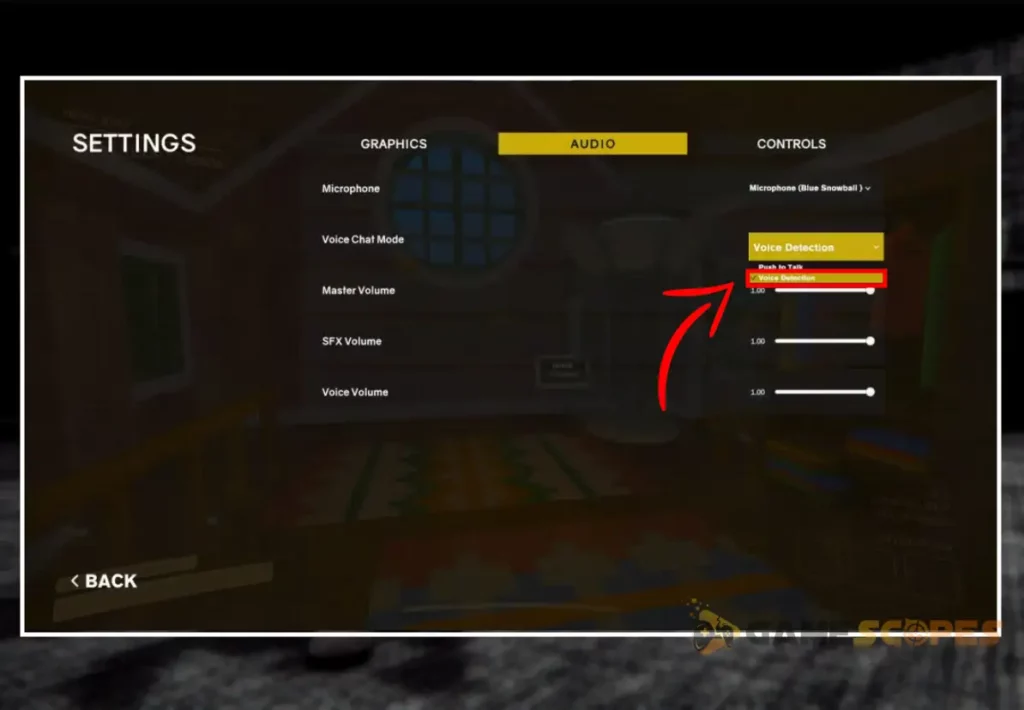
2. Enable the CW “Voice Detection”
If you’ve selected the correct microphone from the Content Warning settings, the reason why your teammates can’t hear you may be due to incorrect Voice Chat mode.
Content Warning provides two input modes “Push to Talk” and “Voice Detection”. The main difference is that with “Push to Talk” you must press a button to speak, and “Voice Detection” keeps your microphone listening and you only need to talk.
So, we recommend going into the Settings → Audio and setting “Voice Chat Mode” to “Voice Detection.”
When ready, jump into the game and test if your voice chat is now working!
3. Increase your CW Voice Volume
It’s not excluded that your microphone is working just fine, but the voice chat in Content Warning does not work because the volume is too low. So, before exiting the game and continuing with more complex troubleshooting methods, we recommend increasing the in-game Voice Volume.
Here’s how to boost Content Warning in-game voice volume:
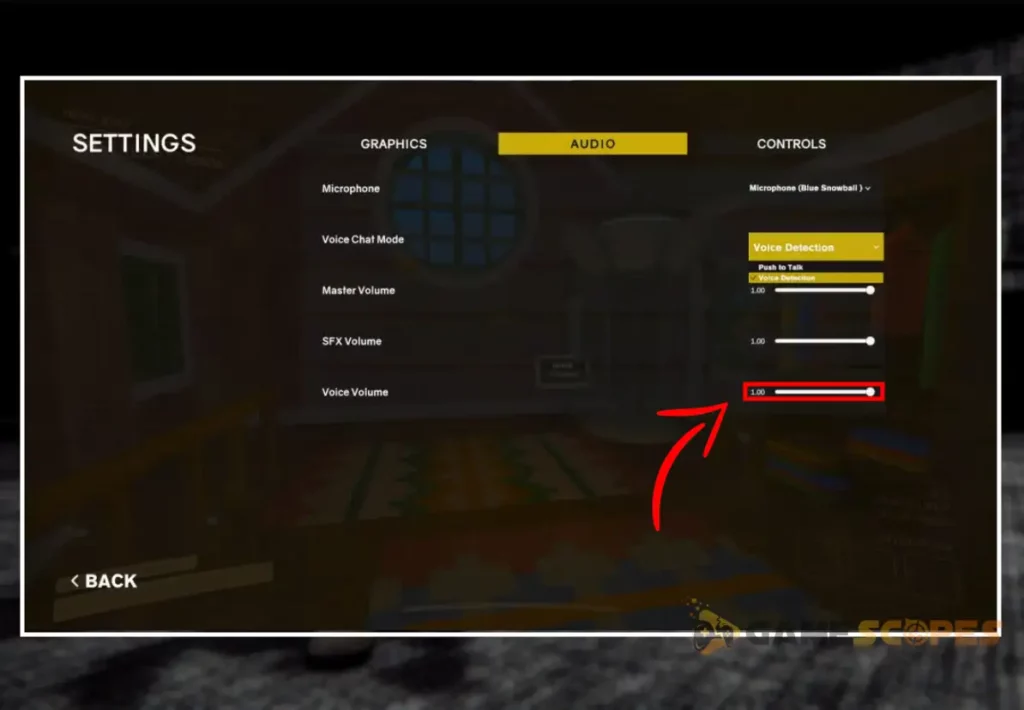
Open Content Warning and head to “Settings.”
Click the “Audio” tab and find “Voice Volume.”
Drag the slider to the right reaching at least 75%.
You should now be able to hear all participants in the Content Warning voice chat so try it out!
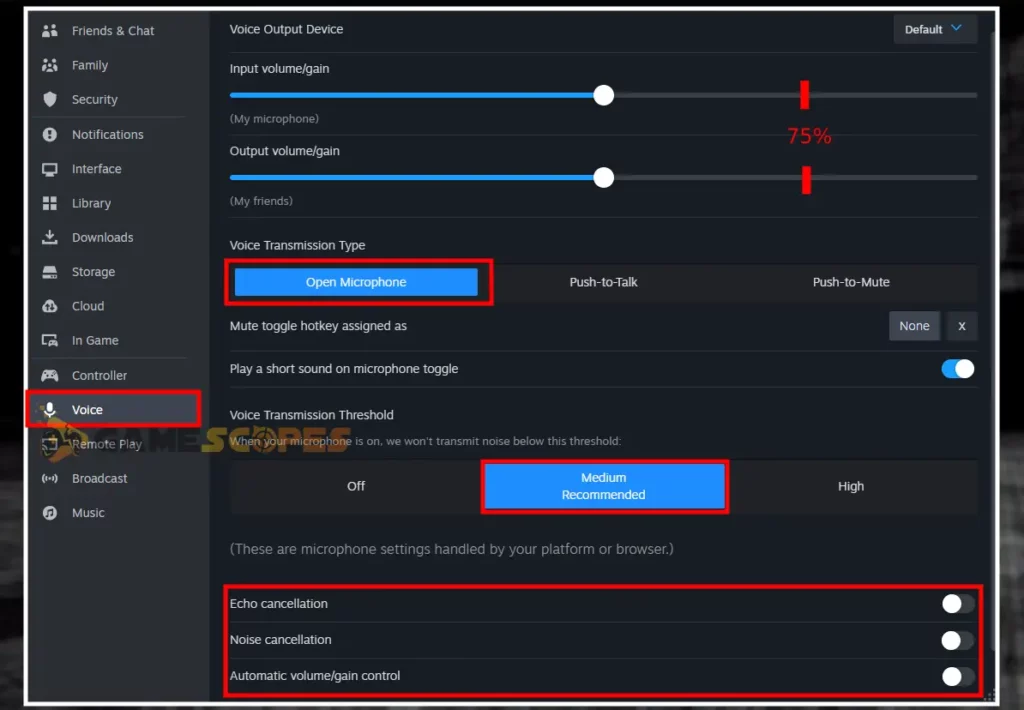
4. Tweak the Steam “Voice” Settings
Some of the Content Warning in-game settings overlap with the Steam “Voice” settings. This means that even if the in-game options are correct, your Steam launcher configuration might cause the trouble you’re facing with the Voice Chat.
So, you need to check those settings and configure them accordingly. To access the Steam launcher options, go to “Steam Settings” → “Voice.”
Then, configure the options as per the recommendation:
Input volume/gain – 75%
Output volume/gain – 75%
Voice Transmission Type – Open Microphone
Voice Transmission Threshold – Medium
Echo cancellation – OFF
Noise cancellation – OFF
Automatic volume/gain control – OFF
When read, restart the Steam launcher, open Content Warning, and check if your Voice Chat is now working. If not, continue reading…
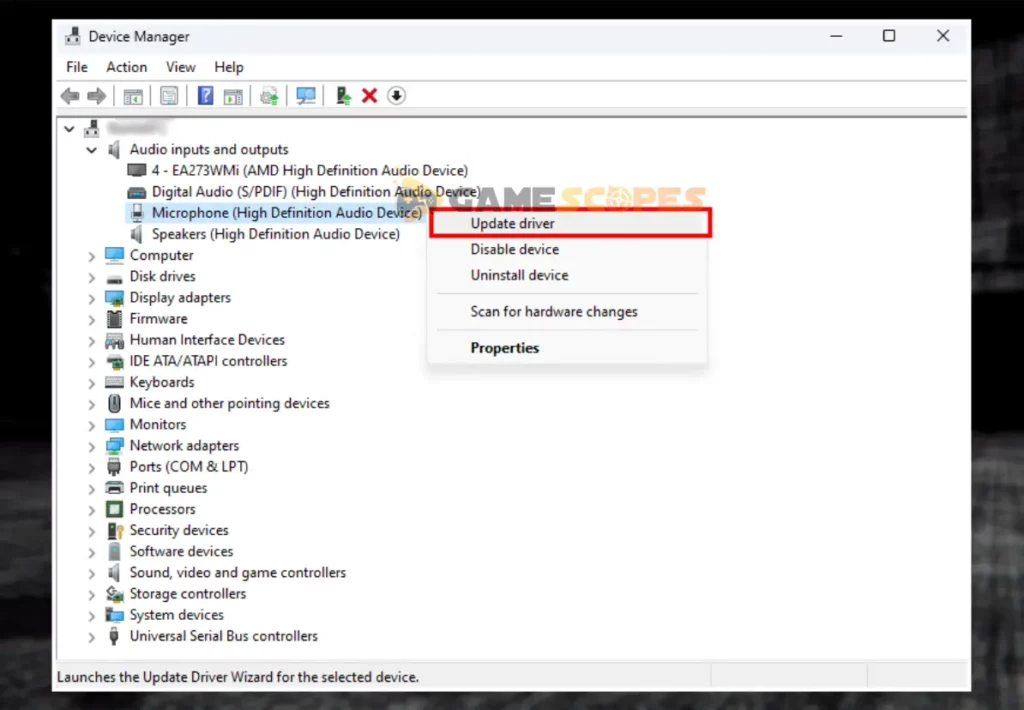
5. Verify the PC Recognizes the Mic
If you hear other participants in the Content Warning voice chat, but they don’t hear you, there is a high chance that your microphone is not working. This doesn’t necessarily mean that the mic is defective, rather than your gaming machine not detecting the input or your entire microphone.
So, follow the steps to ensure that your PC recognizes your mic:
Exit Content Warning and click the “Start” menu.
Type “Device Manager” and open the manager.
Expand the “Audio inputs and outputs” section.
If you see your microphone, right-click and “Update driver.”
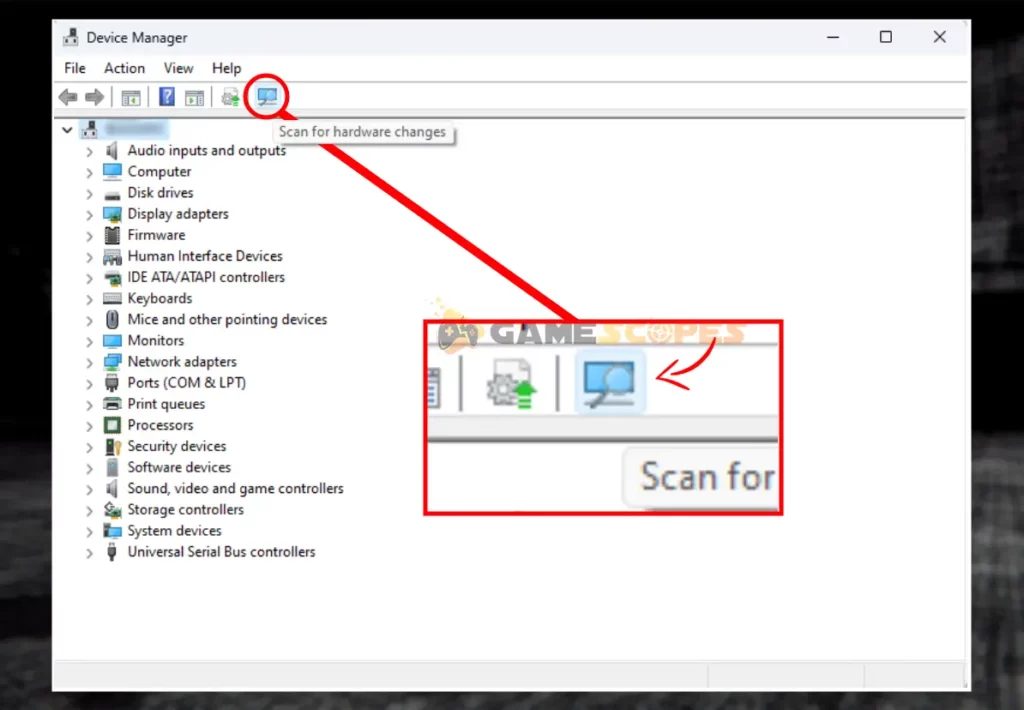
If you don’t see your mic, click “Scan for hardware changes.”
Your microphone must appear under “Audio inputs and outputs”, otherwise not only Content Warning voice chat won’t work, but also communication in other games. So, if your microphone won’t appear there, jump to step #8 and apply the instructions until your microphone shows up.
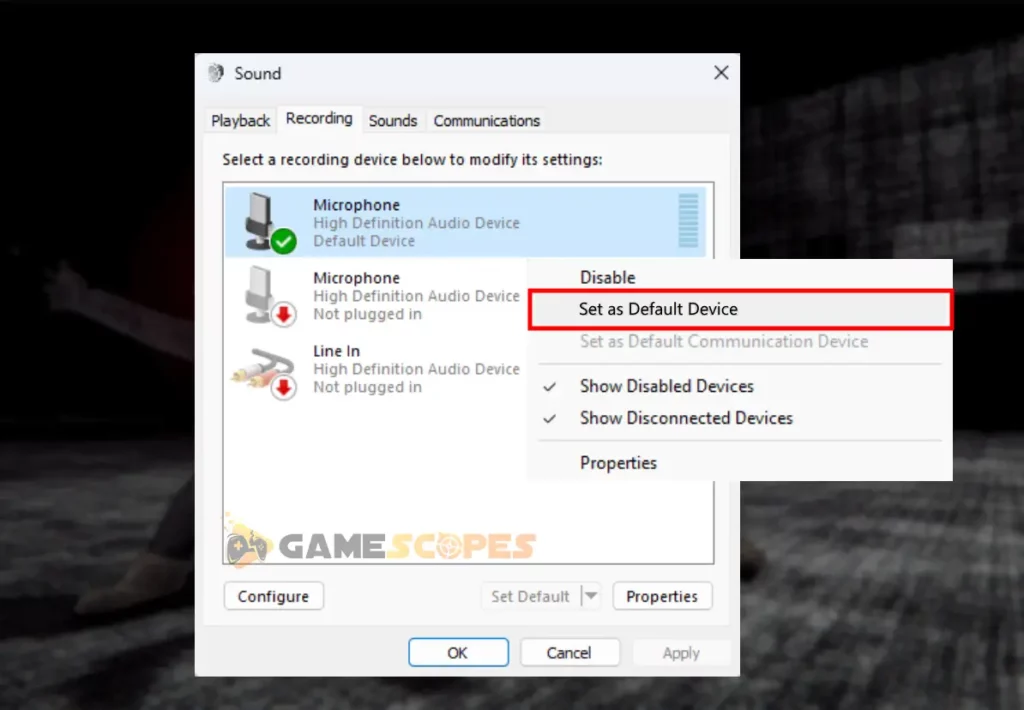
6. Select your Mic as a Default Input
Well, sometimes, the Content Warning voice chat not working because your Windows system prioritizes another input device, not the microphone you want. So, there is a quick way to correct this by telling your operating system, which microphone you want to be used in all tasks/games.
Here’s how to select your mic as the default Windows input device:
Click the Start menu and type “Sounds.”
Then select “Change System Sounds.”
Verify you’re viewing the “Recording” tile.
Locate and right-click on the microphone.
Lastly, choose “Set as Default Device.”
Whit this configuration ready, jump back into the Content Warning, and try out the voice chat!
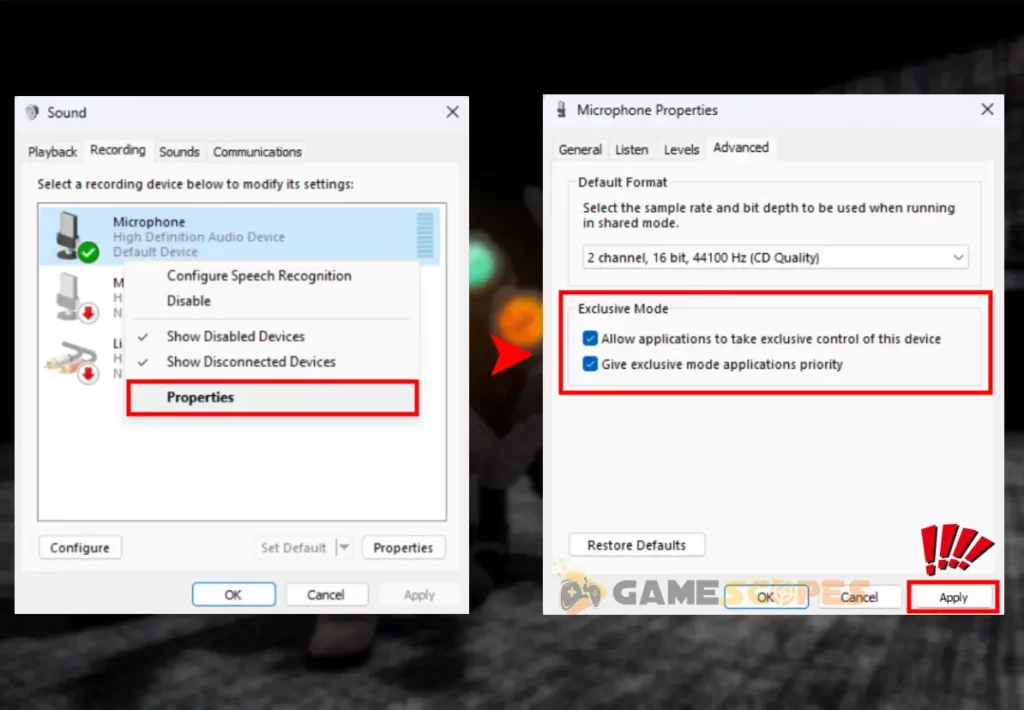
7. Allow Apps to Use the Microphone
In rare cases, even if your microphone is the default Windows input device, the game’s access to the device could be disallowed. So, if Content Warning doesn’t have access to your mic, the participants in the voice chat won’t be able to hear you regardless of what you try.
So, here’s how to allow apps to use your microphone:
From the Start, go to “Change System Sounds.”
Go to “Recording” and right-click the microphone.
Select “Properties” and go to the “Advanced” tab.
Under the “Exclusive Mode” tick both checkboxes.
Allow applications to take exclusive control of this device.
Give exclusive mode application priority.
When you’re ready with providing access, test whether the Content Warning voice chat works!
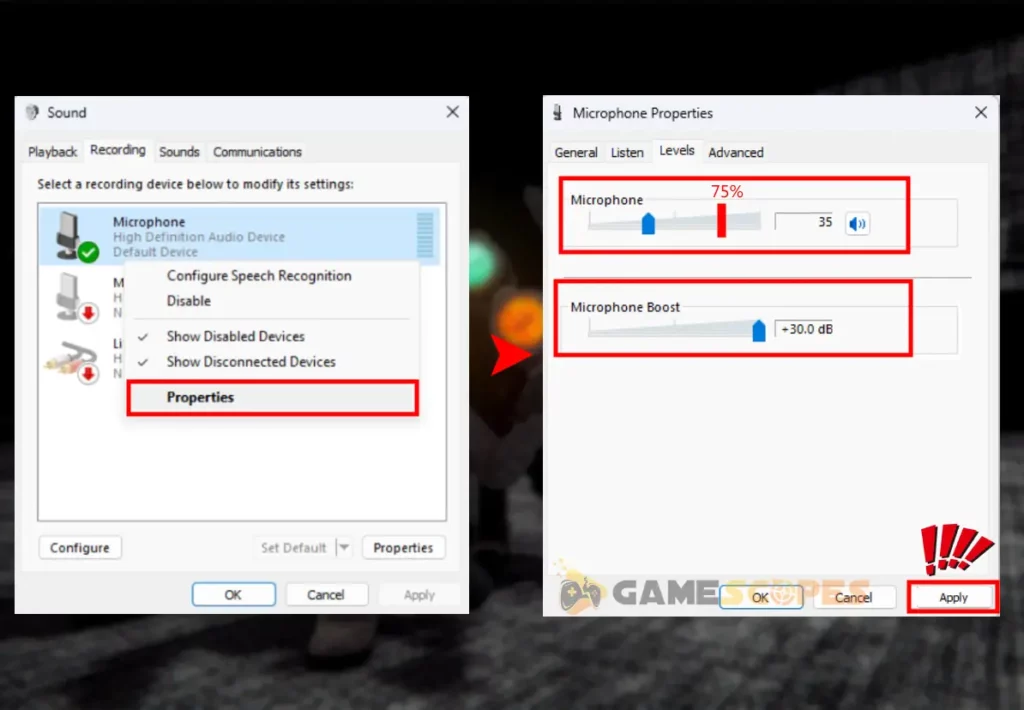
8. Increase Microphone Input Levels
Another crucial factor for Content Warning voice chat to work is your microphone’s input level or “sensitivity”. If your microphone is too quiet, or nearly muted, nobody will hear you speak, and the only way to boost the sensitivity is through the recording settings of your Windows system.
Here’s how to boost the input level of your mic through the Windows settings:
Again, navigate to “Change System Sounds.”
Head to the “Properties” of your microphone.
This time, click the “Levels” tab from the tiles.
And boost your mic levels by a bit (not much).
We recommend setting the microphone level to 75% and adjusting the boost to +25–30 dB. If you over-increase the sensitivity or boost, you might start hearing buzzing or unwanted noises.
Important: Don’t forget to click “Apply” when ready with adjusting these settings!
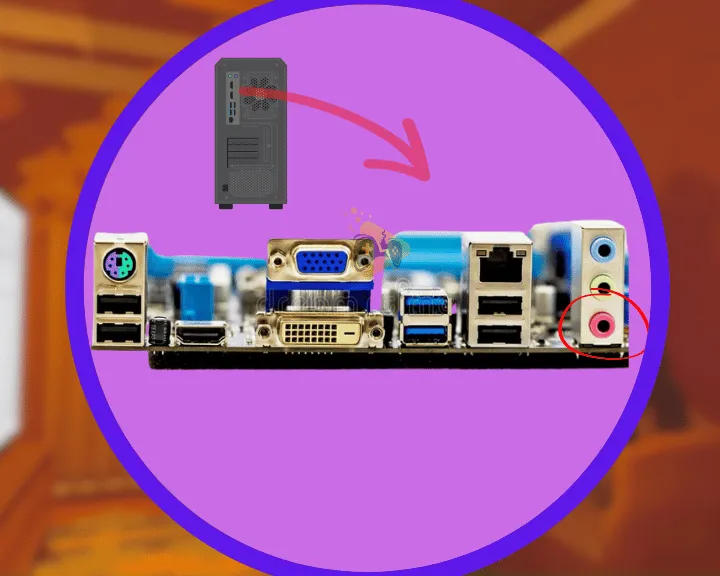
9. Connect Mic to a Different PC Port
Sadly, if your microphone is not recognized by your computer, no matter which settings you change or what you do, Content Warning voice chat won’t work for you. So, if you cannot see your microphone recognized by your computer, simply, plug the device into another port.
If your microphone uses a USB connection, we recommend plugging the device into one of the motherboard ports (on the back).
If your microphone has a 3.5 mm jack connector, ensure that the input port that you use is the “pink” one on the back of the PC.
When ready, head back to step #4 and verify that your microphone appears in the Device Manager.
Conclusion:
So if your Content Warning voice chat not working, you’ll need to set your mic to “Voice Detection” and increase the voice chat volume. Additionally, you’ll need to optimize your Windows input settings and adjust the Steam launcher’s voice options.
Hey there, fellow gamers! I'm the wordsmith behind GameScopes.com with near a dacade of experience in games and troublehsooting gaming devices. I am here to share my true passion and help everyone in the gaming industry.


![[FIXED] Tekken 8 Not Connecting to Server? - (PC/PS5/Xbox)](https://gamescopes.com/wp-content/uploads/2024/06/Tekken-8-Not-Connecting-to-Server_-Fix-for-PC_PS5_Xbox-300x240.webp)
![[FIXED] Gray Zone Warfare Crashing on PC - (10 Solutions)](https://gamescopes.com/wp-content/uploads/2024/05/Gray-Zone-Warfare-Crashing-On-PC-Featured-300x240.webp)