
METHODS:
Fortunately, we have discovered a quick solution if Tarkov not responding after raid!
The “Raid” game mode within Escape from Tarkov is one of the most demanding for the gameplay, reducing high utilization and elevating network resource usage. Typically, a prolonged freeze or delay right after the raid’s end can be related to issues with the “MIP Streaming” feature, anti-cheat interference, or disrupted file integrity.
If Tarkov does not respond right after a raid’s end, disable “MIP Streaming” in the settings, adjust the pagefile of Windows, and change the selected game server. If the issue persists, set Windows to “High Performance” and reinstall EFT.
What Causes Tarkov Black Screen After Raid’s End?
Here’s what causes the Tarkov freezing or black screen at the raid’s end:
- The “MIP Streaming” feature is interfering with the gameplay.
- There’s a remaining profile of a disconnect disk or a drive.
- An issue with Tarkov’s “BattlEye” anti-cheat application.
- Insufficient virtual memory (pagefile) for the “Raid” mode.
- Issues with the selected Tarkov server from the launcher.
Proceed further to uncover reliable solutions for the “Raid” game mode issues with Tarkov!
Tarkov Not Responding After Raid - Quick Solutions!
Note: Have you tried re-opening Tarkov and rebooting your system?
1. Set the “MIP Streaming” to “Off”
Method 1/8
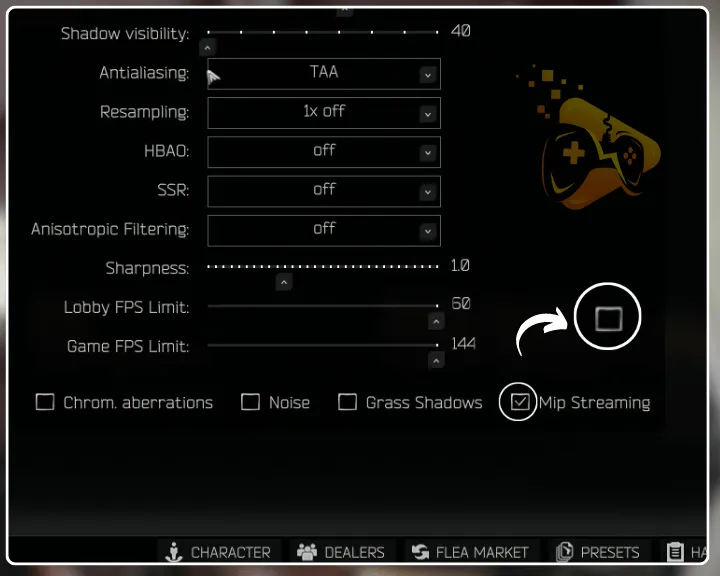
The primary solution for the unresponsiveness of Tarkov after the end of each raid is deactivating the “MIP Streaming” feature within the settings. While the MIP streaming feature enhances performance spikes, it can only be used with a powerful GPU and PC structure!
Here’s how to disable “MIP Streaming” in Tarkov’s settings menu:
- From Tarkov’s main menu, click on the “SETTINGS” tile.
- Next, navigate to “GRAPHICS” from the menu on the top.
- Scroll to the bottom of the page, where the checkboxes are.
- Finally, uncheck the “Mip Streaming” box by left-clicking it.
- Apply the changes to Tarkov’s settings and test the game.
MIP streaming can be combined with other demanding settings to create a high-quality profile within Escape from Tarkov. It is only recommended to use graphic settings of this kind if your PC’s components are compatible!
2. Remove Disconnected Disks or Drives
Method 2/8
Disks or drivers that are no longer connected to your computer but the profile is still registered in the Windows Explorer can interfere with EFT’s anti-cheat software. By the end of each raid, the game’s antivirus automatically scans most of your PC’s directories for malicious software.
The longevity of the freeze at the end of each raid is how long it takes for the anti-cheat software to scan the necessary files for installed hacking software.
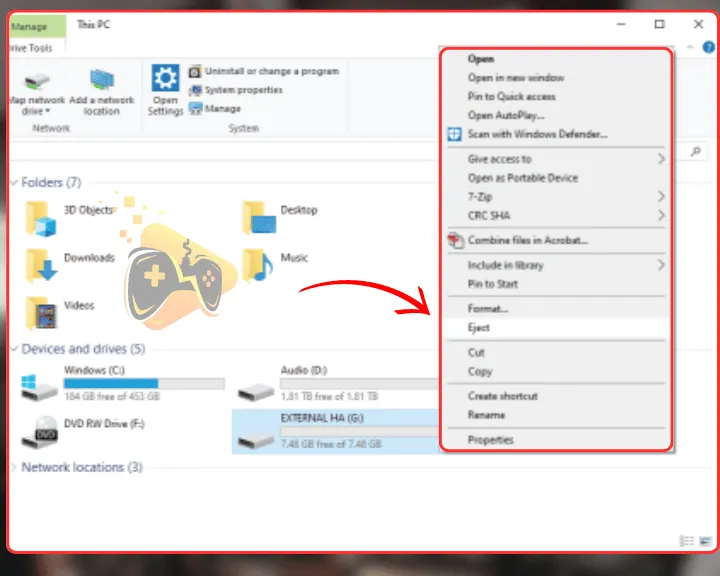
How to Eject Disconnect Disk or Drivers On Windows?
- First, open “This PC” or access it through any other opened folder.
- Right-click the disconnected drive from the “This PC” main menu.
- Finally, select “Eject” from the context drop-down menu to remove it.
- Optional: Repeat for all disks or drives that are no longer connected.
3. Change the Selected Tarkov Game Server
Method 3/8
The most frequent cause for the freeze immediately after the in-game raid’s end is Escape from Tarkov server issues. Fortunately, the developers have provided the users with an option to manually adjust the game server and specify which of the servers can be used.
Here’s how to change the in-game Escape from Tarkov game server:
- Open the Battlestate launcher and wait for it to load.
- Navigate to the “GAME” menu from the upper taskbar.
- Click on “Change server” right above the “Play” button.
- Uncheck the “Use automatic server selection ()” box.
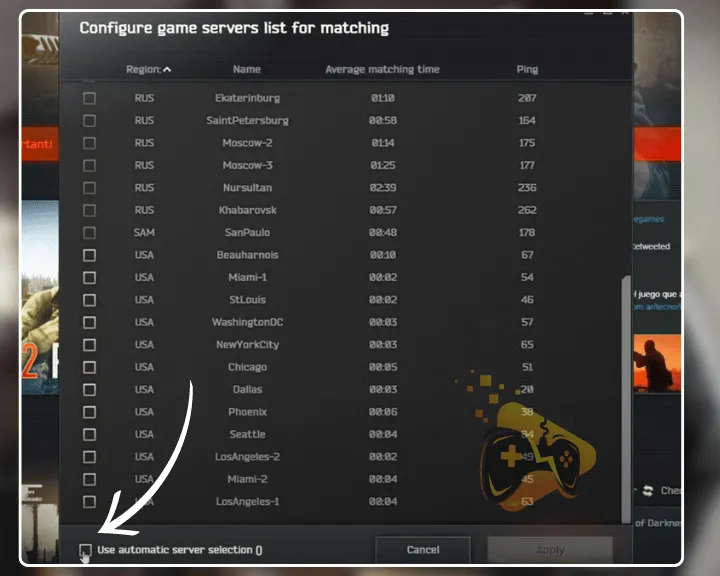
- Select only USA servers from the list and click “Apply.”
- Finally, test Escape from Tarkov’s in-game raid function.
Selecting servers that are physically too far from your device and network may result in high ping, and unbearable lag and cause issues with in-game functions, such as the “Raid” game mode.
Notice: Improper game server selection may also cause download issues with Tarkov!
4. Set Your Windows to “High Performance”
Method 4/8
Another possible solution for Escape from Tarkov’s raid cooldown is setting your Windows to “High Performance.” Using this power plan boosts the performance of live and other CPU-intensive programs, at the cost of more energy.
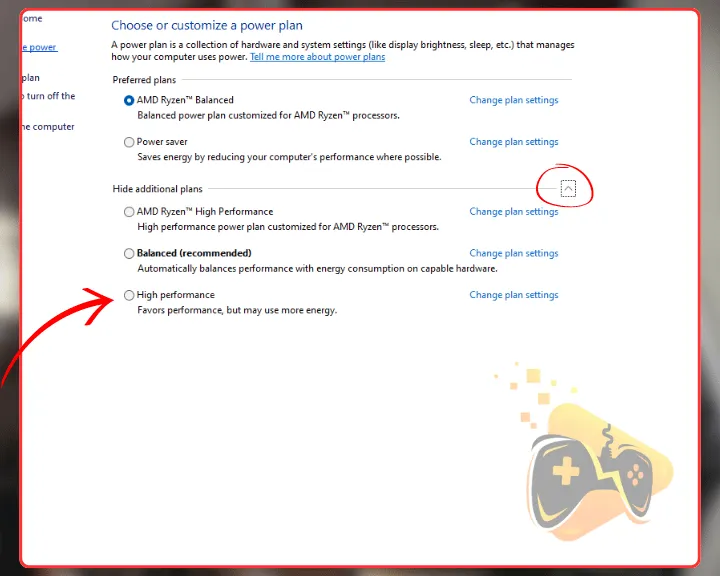
Here’s how to set your Windows to “High Performance” in easy steps:
- Press “Win” + “R” on your keyboard to open a dialogue box.
- Type “powercfg.cpl” and press “Enter” to access the menu.
- Click the arrow button to extend the additional power menu.
- In the power options Windows menu, click “High Performance.”
- Click on the “Save Changes” button and exit the configuration.
It is recommended to track the voltage usage of your system while in-game to determine if setting Windows to high performance has an impact on the power supply. If the voltage levels are elevated, consider safely undeviating your CPU!
Warning: Undervolting your CPU must be done carefully and safely, preferably by a professional!
5. Adjust Windows’s Pagefile (Virtual Memory)
Method 5/8
Perhaps, Tarkov’s in-game performance is reduced due to insufficiency of the virtual memory. You can tweak the pagefile of your system to add more virtual memory available for use and improve the performance of Escape from Tarkov.
Here’s how to adjust the pagefile of your Windows to allow more memory:
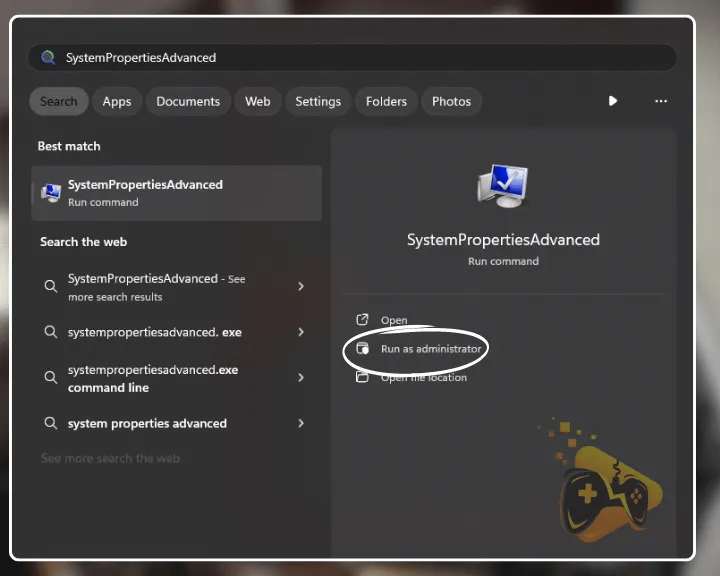
- First, enter “Start” and type “SystemPropertiesAdvanced.”
- Click on the “Run as administrator” function next to the file.
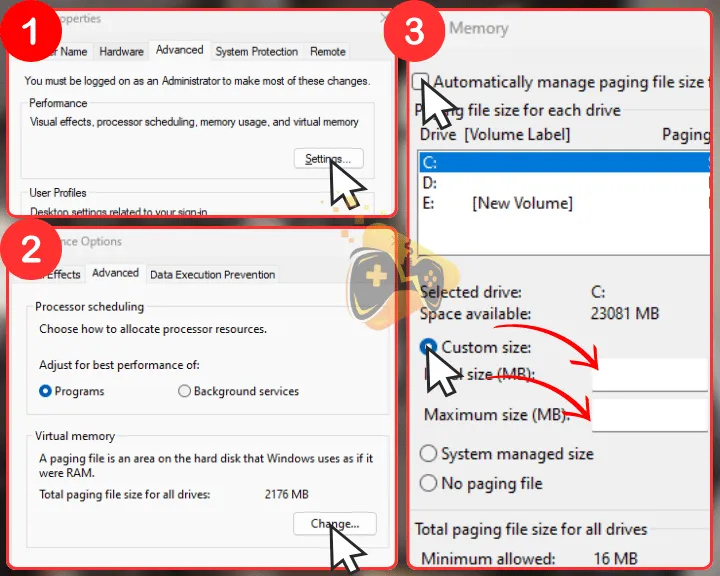
- Then, click on “Settings” under the “Performance” tile in the menu.
- Next, select “Advanced” and then press on the “Change” button.
- Uncheck “Automatically managing paging file sizes for all drives.”
- Enter custom values for the “Initial Size” and “Maximum Size” fields.
- Save the changes and exit the system properties menu of Windows.
The lengthy raid loading screen or ending screen can also be caused by high resource utilization or unavailable RAM storage in particular. Ensure your system is free of background occupation to verify Escape from Tarkov will run smoothly.
6. Uninstall Tarkov’s Generated Log Files
Method 6/8
Too many log files may cause a mild loading slow-down right after the raid ends while in-game. Fortunately, you can uninstall those excess cache files right through the Battlestate launcher, as long as Escape from Tarkov is updated to the latest version.
Here’s how to uninstall Tarkov’s generated log files in easy steps:
- First you must access Escape from Tarkov’s installation directory on your PC.
- Navigate to “This PC” → “Local Disk (C:) or (D:) → “Battlestate Games” → “EFT.”
- Enter the “Logs” folder from the menu and press “CTRL” + “A” on your keyboard.
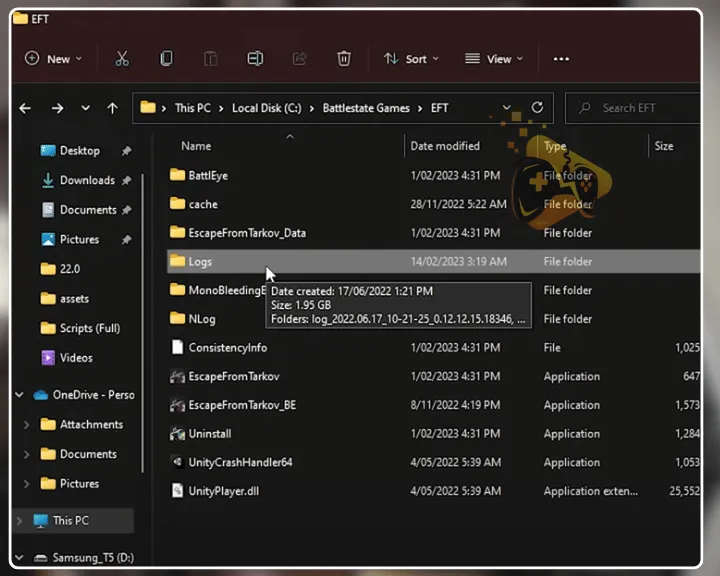
- Uninstall all files by right-clicking or pressing “Shift” + Del” and confirming the prompt.
- Finally, exit the menu and re-launch Tarkov to test the “Raid” mode’s performance.
Tip: The log files must be erased every once in a while to improve EFT’s performance!
7. Reinstall the “BattlEye” Anti-Cheat
Method 7/8
As established, the black screen after the EFT raid can be a result of an underlying issue with the application’s anti-cheat service. This is why the next solution is to reinstall “BattlEye” from Escape from Tarkov’s installation directory and determine if the raid cooldown persists.
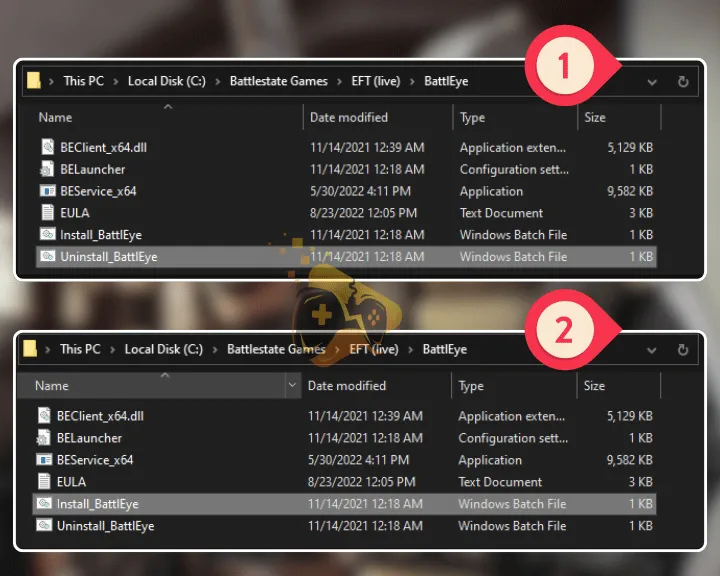
Follow these steps to reinstall “BattlEye” from EFT’s directory:
- Access the directory of Escape from Tarkov on your computer.
- Enter “EFT (live)” and open the “BattlEye” folder from the page.
- Run the “Uninstall_BattlEye” executable file from the directory.
- Next, follow the instructions to uninstall the anti-cheat software.
- Run the “Install_BattlEye” from the menu to reinstall the program.
- Re-launch Escape from Tarkov and test the “Raid” game mode.
Note: Escape from Tarkov may display launch errors while the anti-cheat software is disabled!
8. Wait Until Server Stress is Reduced
Method 8/8
While in most cases particular in-game options or settings are causing the end-screen of each raid to take longer, general server stress must not be excluded from the equation.
Perhaps, all it takes is several hours for the server utilization to be negated and to restore the optimal functionality of Escape from Tarkov. If the issue does not go away after 2–3 hours, consider contacting the Escape from Tarkov customer support for specialized help!
Final Thoughts:
So, if Tarkov not responding after raid, set the “MIP Streaming” feature to “Off,” adjust the virtual memory of your Windows, and set the power plan to “High Performance.” If the issue persists, change Tarkov’s game server or wait until the server stress is reduced!
Related Articles:
- Why Tarkov Not Installing From Launcher? (Fix Download Issues)
- Game Launch Error: 103003 Tarkov – 9 Quick Solutions!
- Hades 2 Crashing On PC – (Ultimate 9 Solutions Guide)
- [FIXED] Gray Zone Warfare Crashing on PC – (10 Solutions)
- [FIXED] Content Warning Keeps Crashing On PC – (12 Solutions)
- How to Fix The Outlast Trials Keeps Crashing On PC? (Quick Fix)
- How to Fix Dragon’s Dogma 2 Crashing? – 10 Solutions for PC
- Elden Ring Multiplayer Not Working – Fix for PC/PS4/Xbox
- Helldivers 2 Multiplayer Not Working – 9 Fixes for PC/PS5
- The Outlast Trials Co-Op Not Working – Fix for PC/Xbox/PS5