


Is your Steam Deck not turning on after update? There’s a simple solution!
Navigation Table
Toggle
A recent Steam Deck update might have damaged some of the system files, preventing the console from undergoing a secure startup. There are multiple methods to manage or revert file impairment as a result of a problematic update, so let’s go over some of the solutions:
If the Steam Deck isn’t turning on after a recent update, “force” restart the console and ensure the internal battery is charged sufficiently. If the fault continues, attempt to access the Dock’s “Boot” menu and remove any third-party equipment.
For a complete walkthrough of the solutions, keep reading further!
Why is My Steam Deck Not Working After Update?
Here’s why the Steam Deck isn’t turning off after a recent update:
- Corrupted OS version or damaged file integrity.
- Charging issues with the Steam Deck console.
- A malfunction of the console’s “Power” button.
- Interfering third-party Steam Deck equipment.
- The Steam Deck’s hardware has overheated.
As a result of the damaged OS directories, the Steam Deck may refuse to launch and immediately stop showing on your TV. Other possible signs are inactive LED lights, unresponsiveness to “Power” button presses, or flickering of the display.
Proceed with the guide to uncover expert solutions!
Steam Deck Not Turning On After Update - Top Fix!
Tip: Follow the instructions in a consecutive order!
1. Force Shutdown Your Steam Deck
If the console is refusing to start after a recent system update, the most reliable resolution is to initiate a “forced” restart, by holding the Deck’s “Power” button. The button can be found on the outer periphery of the console and sets the Steam Deck to “On” or “Off” after a 2–3-second press.
Here’s how to force restart the Steam Deck in easy steps:
- Find the “Power” button on the upper Steam Deck panel.
- Press and hold the button for 10–15 seconds to reboot.
- Wait for 30–40 seconds while the Deck is powered off.
- Next, press the “Power” button again to start the Deck.

Note: Ensure the “Power” button isn’t stuck or difficult to press while force resetting the Deck!
2. Fully Recharge Your Deck’s Battery
If forcing a system restart did not have any effect on the Steam Deck, perhaps the console needs recharging. You should not forget that applying an OS version, especially if the update is larger, may require a large portion of your Steam Deck’s battery power.
Not only the update may drain the Deck’s battery, but it could also be impactful to the console’s internal temperature and even cause overheating. Learn how to optimize Steam Deck battery during gaming sessions in up to 10 tips with our expert guide!
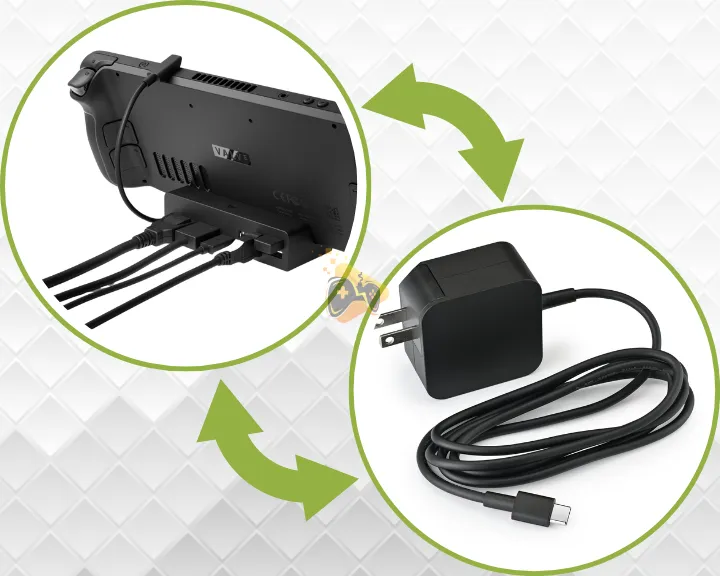
How to Charge Steam Deck Using Dock?
An alternative to using a direct power adapter connection is utilizing the Steam Deck Dock, allowing for seamless power transfer without having to deal with extra cable. Simply lay over the console on the top of the Dock, wait until the LED illuminates, and wait until the device is usable again. If the Steam docking station won’t work, ensure all cords are connected securely!
How to Charge Deck With Direct Adapter?
The standard method for charging the Steam Deck is using the provided USB type-C with a compatible power adapter between the range of 9V up to 24V. In addition, ensure the electrical outlet used to charge the Steam Deck is in proper condition and test it with another device.
If the Steam Deck fails to charge, here’s how to check if the charging equipment is bad.
3. Adjust the Steam Deck’s Boot Priority
You can use the Steam Boot Manager to “roll back” the console to a previous system version and revert any file integrity damages. The boot menu will be accessible regardless of the damages inflicted to the Steam Deck’s OS since it is integrated into the unit’s ROM battery or “BIOS.”
- Hold the “Volume DOWN” and “Power” button for 5 seconds.
- Next, wait until the Steam Deck accesses the Boot Manager.
- Highlight a previous Steam OS version and press on “Select.”
- Finally, within the menu, you will have the following options:
- [Boot into “Current OS” – *System Version Name* *Date Applied*]
- [Boot into “Previous OS” – *System Version Name* *Date Applied*]
- [Boot into “Current OS Boot Menu” ]
- [Boot into “Previous OS Boot Menu”]
- [– ERASE USER DATA FROM DECK –]
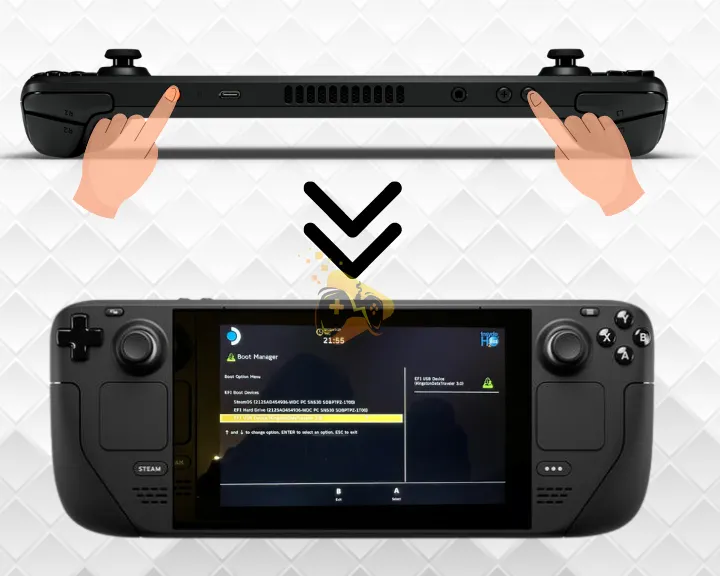
Tip: It is recommended to connect the Steam Deck with a charger prior to accessing the menu!
4. Reduce Your Deck’s HW Temperatures
Another reason for the failed startup is the highly elevated internal temperature of the Steam Deck.At times, OS updates can be very demanding in terms of CPU utilization and occupation of the console’s system resources. If not ventilated properly, the Steam Deck could overheat amidst the update, causing the system to enter “Emergency” mode before the temperature has dropped.

What’s Steam Deck’s Temperature Margin?
The console should be working fine before it surpasses 212°F (100°C). Anything over that and the console will feel extremely hot to the touch and the internal fans’ RPM will boost significantly, resulting in a loud ventilation noise.
How to Reduce Steam Deck Temperature?
Here are a few potential tips to reduce the Deck’s temperature:
- Ensure the vent openings on the chassis are free of dust.
- Disconnect the Steam Deck from the charging equipment.
- Keep the Deck in a vertical position for better conditioning.
Note: Do not attempt to start or use the Steam Deck before the rear panel has cooled down.
5. Access the “Recovery” Manager (BiOS)
If the Steam Deck is still not turning on, you should attempt to start up the console under “Recovery” system mode. Similar to the “OS” menu, you will be able to initialize all system failures and factory reset the Steam Deck if it fails to boot up the OS regularly.
Here’s how to boot the Steam Deck in “Recovery” mode:
- Press the “…” side button and “Power” on the Deck simultaneously.
- Hold the buttons for ~15 seconds or wait until the screen illuminates.
- Check if you will enter the “Recovery Mode” screen and see the options.
- Highlight and select “Reinstall Steam OS” from the available options.
- Optional: Re-image the Steam Deck, which is similar to a factory reset.
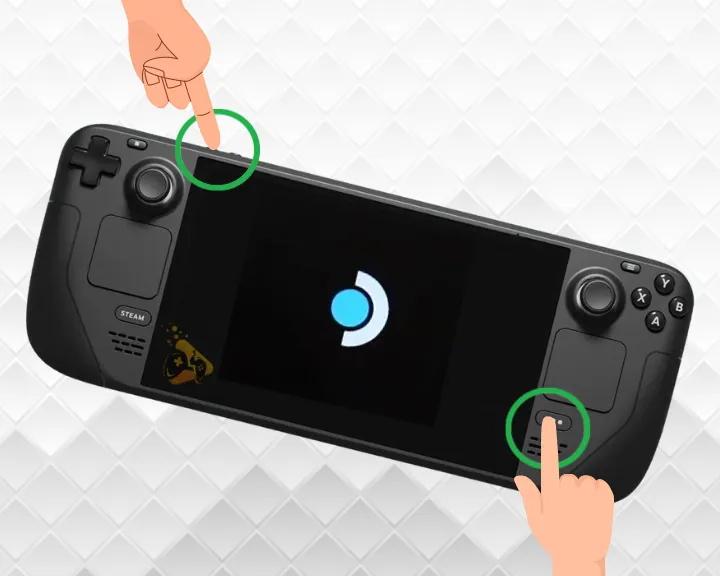
The difference between reinstalling the Steam OS will erase all pre-configured system settings and erase all data on the device. Unlike reinstalling the OS, applying a new image keeps some of the Steam Deck’s information and only reverts the system settings to default values. Also, if you’re experiencing touchscreen problems with your Steam Deck, we have a nifty guide to help you out.
Note: The Steam OS reinstallation or the application of a new image may take up to 5 minutes!
6. Remove Any Third-Party Equipment
The next step is to ensure that no defective third-party equipment is influencing the Steam Deck’s startup. Using a defective charging cable or docking station may prevent the console from starting up properly or have a negative impact on the internal battery.
Avoid installing the following third-party equipment with the Steam Deck:
- The Steam Deck’s docking station.
- Any charging equipment or adapter.
- Direct connection to a TV or a display.
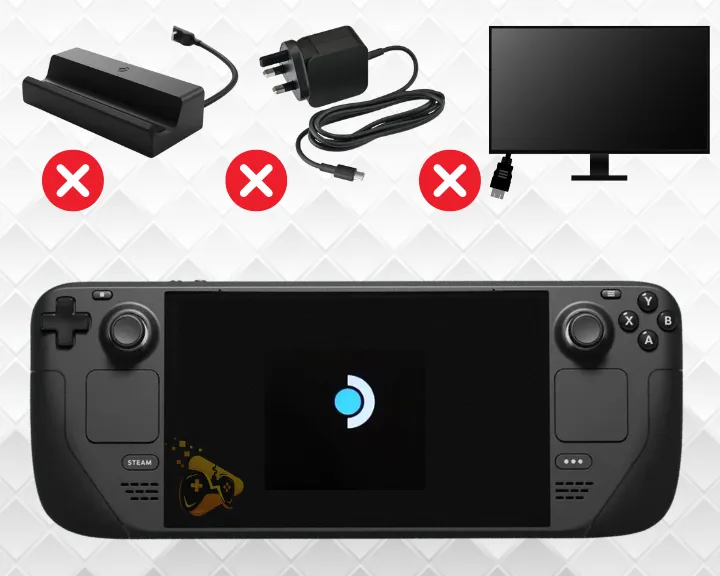
Even if the Deck starts successfully, defective external devices connected to the chassis may also cause Wi-Fi connection issues or result in controller problems.
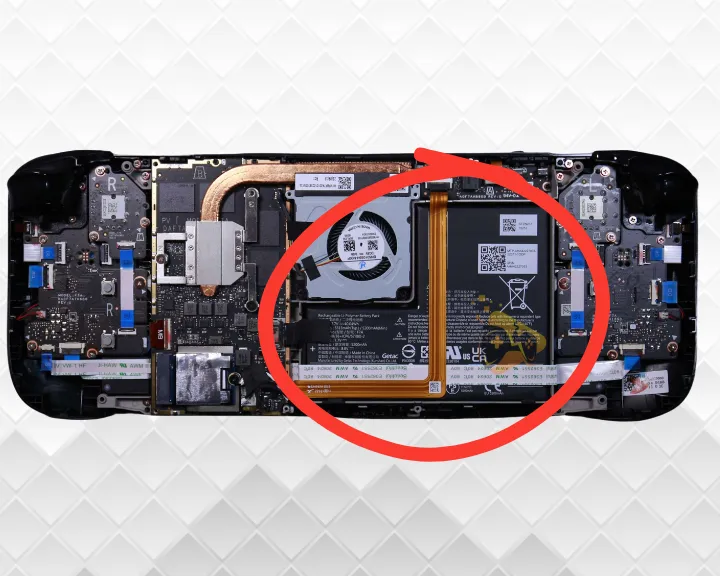
7. Reinsert the Steam Deck’s Battery
If a recent update has integrated changes to the battery behavior, the console may refuse to start up until further notice. Removing and reinserting the Steam Deck’s battery is one of the most effective resolutions, even if it requires some technical expertise. Fortunately, opening and accessing the Steam Deck’s hardware will not void the product warranty, so you always get in touch with Valve Customer Support in case of an issue!
Tip: It is recommended to fully deplete the battery’s charge before removing it from the Steam Deck’s casing!
Here’s how to reinsert the Steam Deck console’s internal battery:
- Undo the 8 screws on the Deck’s rear panel using a Philips screwdriver.
- Insert an opening back into the gaps between the rear and front panels.
- Lift off the back cover and expose the Steam Deck’s internal hardware.
- Optional: If there’s a silver motherboard cover, remove it using tweezers.
- Remove the 3 screws securing the motherboard’s shield onto the underside.
- Disconnect the motherboard adapter gently using the integrated pull tab.
- Unplug all the connectors to loosen the plastic stripes securing the battery.
- Next, use a heat gun or hair dryer to heat up the Steam Deck’s battery.
- Push up to 3 plastic cards into each joint of the battery for easier removal.
- Gently pull the battery upwards and reinstall it after waiting for 30 seconds.
Tip: Here’s an excellent Steam Deck battery replacement guide to visualize our steps!
Final Thoughts:
If the Steam Deck not turning on after update, attempt to access the console’s boot menu, fully recharge the battery, and remove third-party equipment from the setup. If the fault persists, reduce the console’s hardware temperature and reinsert the battery unit.
Related Articles:
- Steam Deck Touchscreen Not Working – Ultimate Solution Guide
- Steam Deck Not Finding Xbox Controller? (7 Proven Solutions)
- Steam Deck Dock Not Working [7 Easy Methods]
- Steam Deck Not Connecting to WiFi – 9 Quick Solutions
- Why Steam Deck Won’t Show On TV? – 7 Proven Solutions
- Steam Deck Not Playing Through Headphones – Here’s How to Fix
- How to Play Steam Deck With Mouse and Keyboard? – Quick Steps
- How to Play Non Steam Games On Steam Deck? – 5 Easy Steps
- 10 Tips for Steam Deck Battery Optimization – (Extend Battery Life)