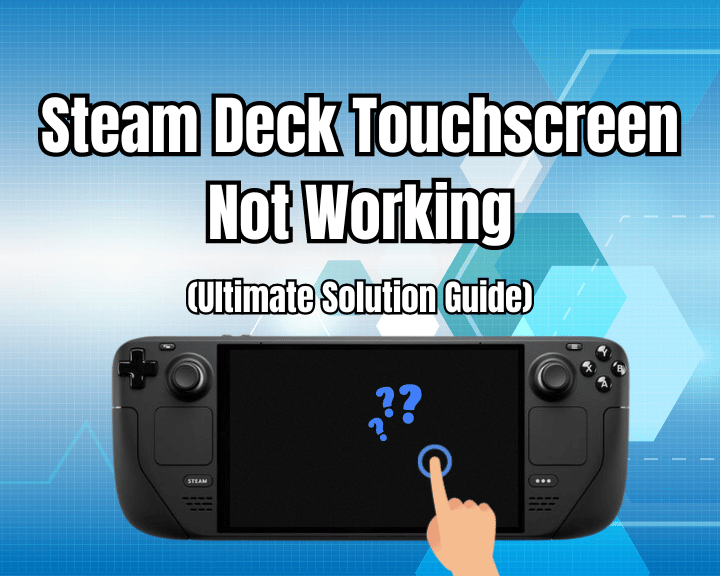

If your Steam Deck touchscreen not working, know that you’re not the only one, hence there are a bunch of methods that fix the problem instantly. We’ve prepared only methods that are proven to work, and we’re going to walk you through in-depth instructions, all tested and verified to fix the non-working touch input of your Steam Deck.
So, if your Steam Deck touchscreen is not working, put the console in Battery Storage Mode, and if this doesn’t help, flush the BIOS using a USB flash drive. Additionally, you might need to update the system or perform a factory reset.
We’ve prepared detailed steps for each of these solutions, so continue reading to fix the issue!
Steam Deck Touchscreen Not Working - Quick Fix!
Tip: Follow the guide chronologically!
1. Put Deck in Battery Storage Mode
Method 1/5
If your Steam Deck touchscreen not responding, a quick, but temporary solution would be to put the console in “Battery Storage Mode”. This is very easy and solves the problem in an instant, but you never know when the issue will appear again.
However, if you want to get this over with immediately, follow these instructions:
- Power off the Steam Deck by using the Power button.
- When it’s off, hold the Volume Down + Power buttons.
- This will boot the Steam Deck right into the BIOS menu.
- Then using the D-Pad and A, navigate to “Setup Utility.”
- Go to the Power Menu and select “Battery storage mode.”
- Confirm when prompted and the Steam Deck will restart.
- The Deck’s power LED will blink 3 times as an indication.
- Connect your Steam Deck to power and turn the unit ON.
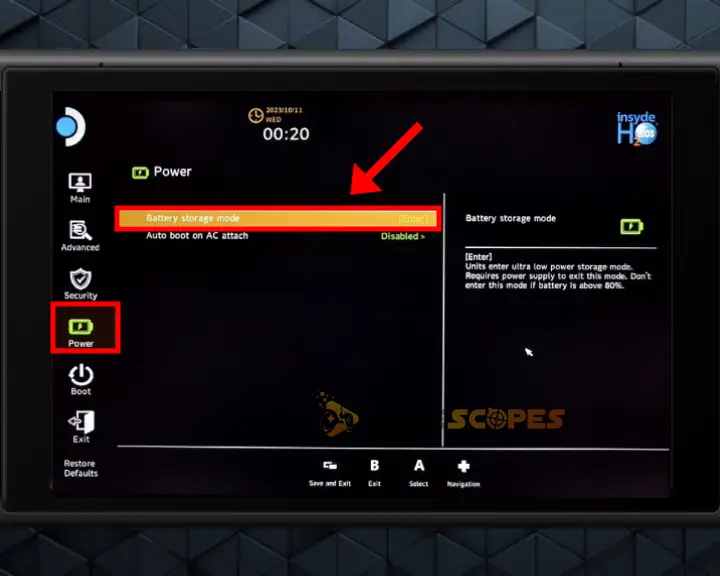
This should immediately fix the Steam Deck touch screen problem and it should now be working, but the problem might come back… However, if you’re looking for a permanent solution, we strongly recommend flushing the BIOS!
2. Flush/Update the Steam Deck BIOS
Method 2/5
If your Steam Deck touch screen not working, the best and permanent solution that will surely fix the issue instantly is flushing/updating the BIOS. This will not affect the Deck’s storage, which means that you won’t lose any data, and will update and reset the settings of the device’s BIOS.
What is BIOS? The operating system of the Steam Deck’s motherboard!
This solution is quite long and requires a USB flash drive as well as 30 minutes of your time, but guarantees that the touchscreen problem will disappear. So, we are going to walk you through in-depth steps that you can achieve even if you have never seen the BIOS of your Steam Deck, or done anything similar before.
2.1 Prepare & Format a USB Flash Drive
To flush and update the BIOS and fix the Steam Deck touchscreen problem, you’re going to need a USB flash drive with about 2–4 GB of storage. The update file is only megabytes, but you’ll hardly find a flash drive with 1 GB of storage or less.
To begin with, connect the USB flash drive into your PC and follow the steps:
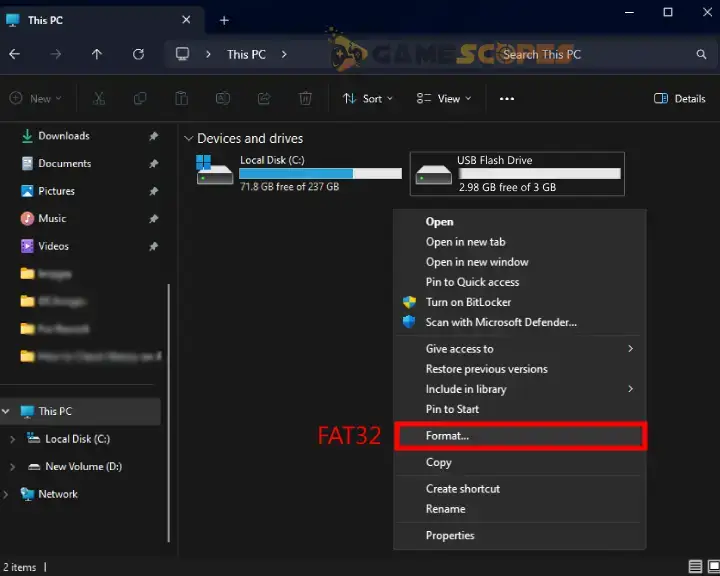
- First, open a File Explorer, and right-click on the USB drive.
- Select “Format…” and under “File System” choose “FAT32”.
- Then, click “Start” and wait until the flash drive is formatted.
- Info: This will delete everything from your USB flash drive.
When the flash drive is formatted, continue with uploading the Steam Deck’s BIOS firmware!
2.2 Uploading the BIOS Firmware to USB
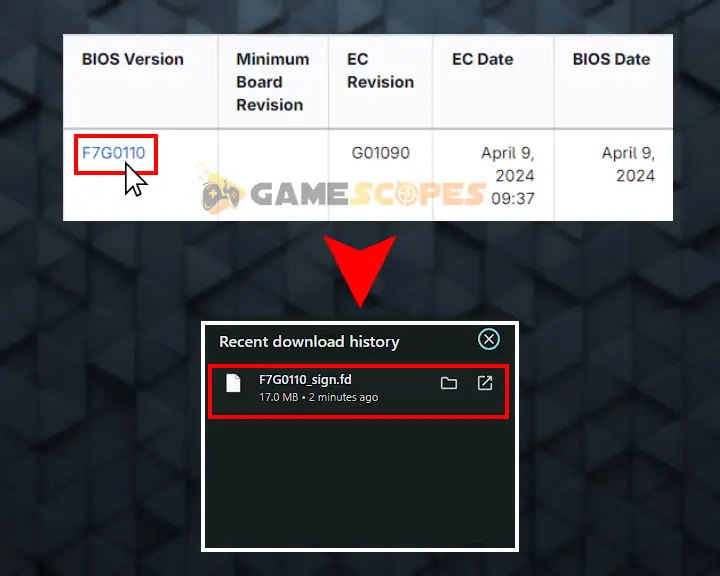
When your USB flash drive is completely empty and formatted to “FAT32” it’s time to download the BIOS update file for the archlinux. The most recent BIOS build will be on the top, so click on the file to download it on your PC.
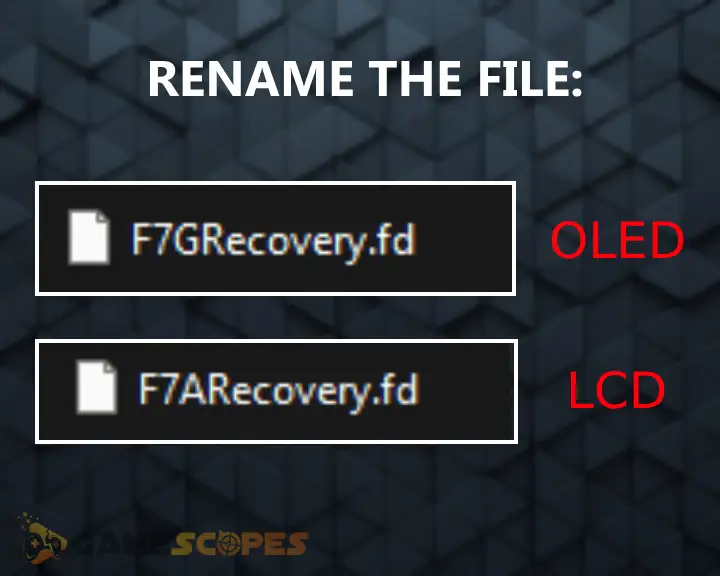
The file will be named something like “F7G0110_sign.fd” but you need to rename the file based on your Steam Deck version. So, if you have a Steam Deck OLED, rename the file to “F7GRecovery.fd” and if you have the LCD Deck, rename it to “F7ARecovery.fd”. When ready, drag and drop the file into the USB flash drive connected to your PC, and verify that there is nothing else on it, besides the BIOS.
That’s it with the USB flash drive, for now…
2.3 Connecting USB Drive to Steam Deck
The next step is to connect the USB flash drive to your Steam Deck either by using a USB-A to USB-C dongle, or via the Steam Deck Dock. Sadly, there is no USB-A port available on the Steam Deck itself, so you either need the adapter, or the ports available from the docking station.
2.4 Flushing/Updating Steam Deck’s BiOS
Here’s how to update the BIOS of your Steam Deck when you have everything set up:
- First, verify that the Steam Deck is charged to maximum battery.
- Also, ensure that there is nothing else connected to your Deck.
- Power off your Deck by holding the Power button for 10 seconds.
- Then, find, press and hold both, the Volume Down + “…” buttons.
- While holding, press the Power button on the Steam Deck once.
- Keep holding both buttons a few seconds after releasing the Power.
- The Power LED of the Steam Deck should start flashing on and off.
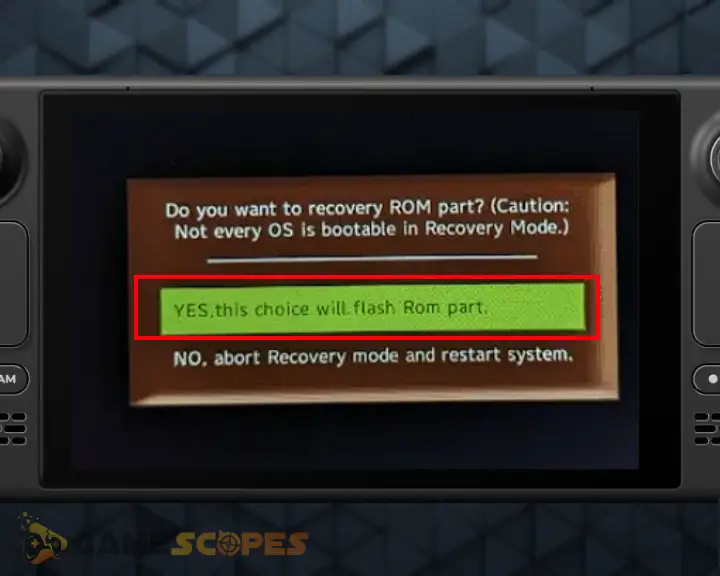
Your Steam Deck should now enter “Crisis Mode”. If not, you will need to connect the Deck to power and turn it on, which will enable the mode. If everything worked successfully, you should see a prompt asking you to confirm if you want recovery ROM to be booted on the system.
Select “YES, this choice will flash the ROM part”. To select the option navigate using the trackpad and d-pad. This will take some time to complete, so lean back, and let your console update the BIOS.
3. Update your Steam Deck’s System
Method 3/5
If your Steam Deck touch screen stopped working suddenly, and updating your BIOS did not help, perhaps updating the system will. So, press the Steam button, head to Settings → System → Software Updates and when prompted restart your Steam Deck.
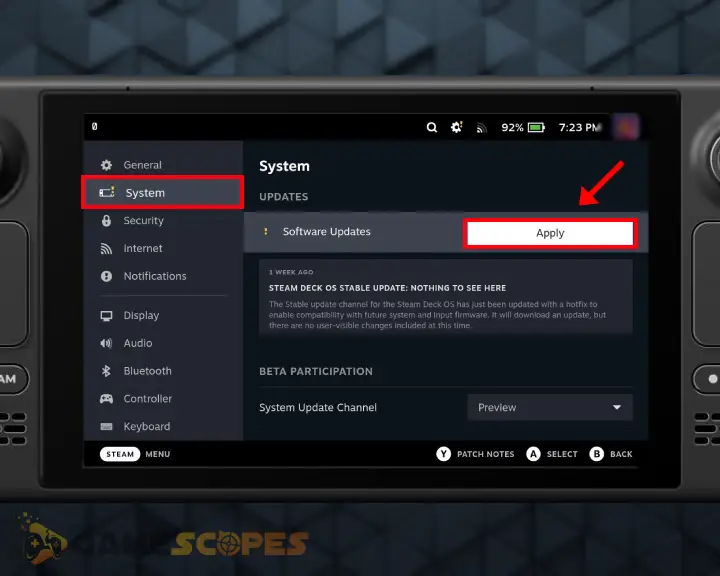
However, remember that updating the software requires a reliable connection to the internet, so before attempting to update verify that your Steam Deck is online. After updating, check if the touchscreen problem is still there, and if yes, continue reading…
Note: Sometimes the Steam Deck will not turn on after update, but we got you covered!
4. Remove the Deck’s Screen Protector
Method 4/5
If your Steam Deck touch screen not responding or behaves weirdly, know that the issue could also be caused by a screen protector. So, if you have a screen protector on your Steam Deck, we recommend removing it now, and checking whether the touchscreen will start working again.
Just peel the screen protector off, and shutdown → reboot your Steam Deck to check if your touchscreen will start responding. If not, there is one last thing to attempt, so keep reading…
5. Reset your Steam Deck to Defaults
Method 5/5
If the Steam Deck touch screen not working, even after attempting the solutions so far, the problem could be related to the system software. One of the most-potent solutions that you should attempt is to factory reset your Steam Deck, which will erase everything from the device.
Here’s how to factory reset your Steam Deck in easy steps:
- Turn on your Steam Deck and enter Gaming Mode.
- Then, press the Steam button from the bottom left.
- Use the D-Pad to navigate to the “System” options.
- Then scroll down to the “Advanced Menu” section.
- Finally, select “Reset to factory state” and confirm.
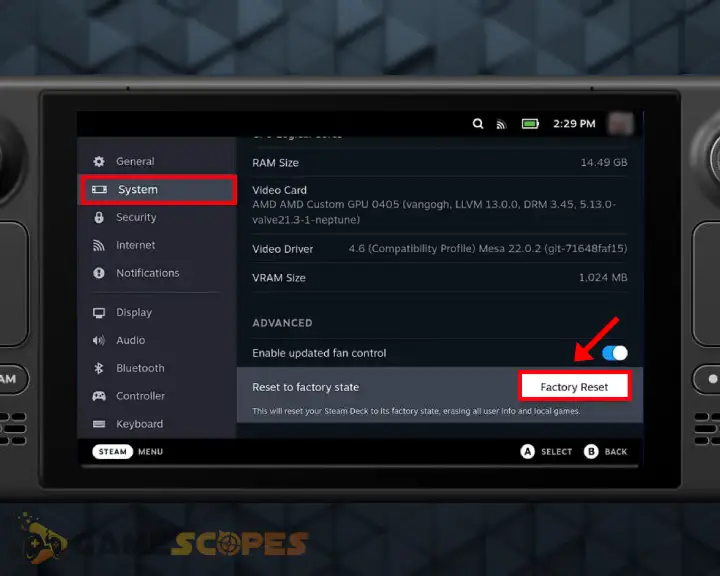
If the process was executed correctly, the Steam Deck will start resetting and when ready the problem will be gone. If, however, your touchscreen not working on Steam Deck even after the factory reset, you may start considering servicing the device as all evidence leads to a hardware malfunction with the display.
Wrapping Up:
Hence, if your Steam Deck touchscreen not working, put the Deck into Battery Storage Mode and update the BIOS via USB flash drive. If this doesn’t help, remove the screen protector, update the system or factory reset your Steam Deck.
Related Articles:
- Steam Deck Not Finding Xbox Controller? (7 Proven Solutions)
- Steam Deck Dock Not Working [7 Easy Methods]
- Steam Deck Not Connecting to WiFi – 9 Quick Solutions
- Why Steam Deck Won’t Show On TV? – 7 Proven Solutions
- Steam Deck Not Playing Through Headphones – Here’s How to Fix
- How to Play Steam Deck With Mouse and Keyboard? – Quick Steps
- Steam Deck Not Turning On After Update?- (Fix It Now Easily)
- How to Play Non Steam Games On Steam Deck? – 5 Easy Steps
- 10 Tips for Steam Deck Battery Optimization – (Extend Battery Life)