

While there are common signs of malfunctioning or misbehaving power outlets, there are plenty of ways to tell whether the faceplate needs replacing. In this guide, we will not only go through the signs of an electrical outlet malfunction but learn how to conduct the replacement by ourselves!
Navigation Table
Toggle
The primary sign of a defective power outlet is melting or discoloring of the faceplate or the plastic cover. You should watch out for flickering lights produced by the outlet’s electrical poles or burnt/carbon monoxide smell near it.
Let’s get in-depth!
What are the Signs of a Bad Electrical Outlet?
Knowing what can potentially represent a fault of the power outlet is essential in providing the technicians with information or troubleshooting the issue by yourself. That’s why the first step is to find out what can be potentially a clue for an underlying malfunction of the power outlet.
Warning: Before inspecting the outlet, disable the circuit breaker’s power to the room.
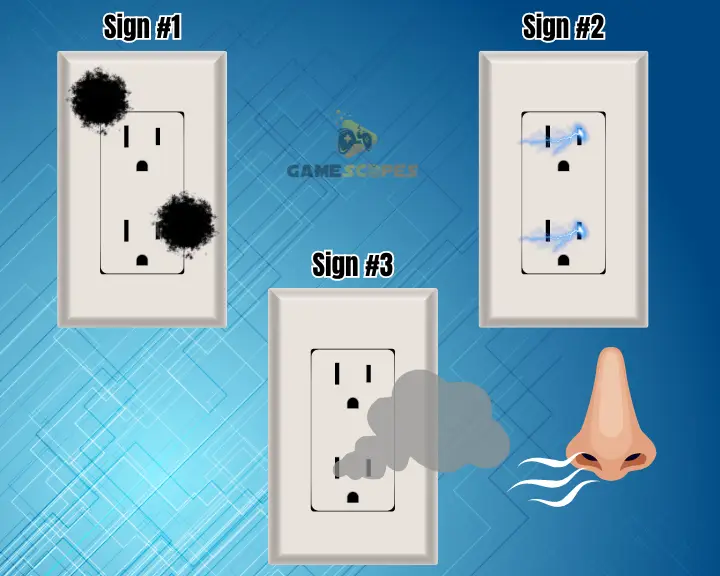
Sign #1 Melting/Discoloring of the Faceplate
The primary sign of a malfunctioning outlet is the melting of the plastic cover’s surface or discoloration of the faceplate. This is a common symptom caused by the elevated outlet temperature or electricity caused by the friction of the defective electrical outlet.
If there are any unusual burnt spots on the faceplate or you notice that some parts of the plastic cover are no longer colored, do not touch the outlet or wear protective gloves!
Sign #2 Flickering Lights
Another visual indication for a malfunction with the power outlet is flickering lights produced by the electrical poles. The outlet should not transmit any electricity unless a device is connected so if it does, that’s a strong sign that there’s an underlying issue.
If you see any lights or electricity produced by the outlet while not in use, do not approach or interact with the outlet at all!
Sign #3 Burning Odor
The last but not least symptom of a defective electrical outlet is the burning odor of carbon monoxide produced near the outlet. If you sense that the smell around the outlet is unusual, you should not walk close to or touch the outlet with bare hands.
In addition, ensure there are no easy flammable objects near the outlet that can potentially get caught in fire or produce identical odor.
Note: If you have a carbon monoxide detector at home, it may go off due to the outlet’s burnt odor!
How to Replace an Electrical Outlet By Yourself?
After finding out whether or not the electrical outlet needs replacing, the next step is to either contact a technician or conduct the replacement by yourself. Keep in mind that replacing the outlet’s faceplate may not be enough in some cases as there could be an issue with the electrical installation!
Approaching the Outlet: Safety Tips!
- Wear protective gloves and thick shoes.
- Place a soft cover or door mat on the floor underneath.
- Work only with isolated instruments and tools.
1. Deactivate the Breaker’s Power Supply
Replacing the outlet with the power supply still enabled is not only impossible but may result in a serious injury if you haven’t paid attention to our safety tips. The first step is to set the room’s power to “Off” at the circuit breaker panel that may be found in your backyard or garage.
Note: All power switches in the breaker’s room are labeled!
2. Uninstall the Current Outlet
Now that the power is disabled, you can proceed with uninstalling and taking off the current outlet faceplate. By default, an outlet is held by 2 or 4 Philip screws based on the faceplate, but you should check your own outlet.
Next, uninstall the cover plate and unscrew the receptacle before removing the electrical outlet’s wires. Storage or use the old outlet to purchase a new faceplate for the installation.
Tip: Before interacting with the outlet, use a tester to determine if there’s voltage!
3. Install the New Outlet Faceplate
Finally, it is time to install the brand-new faceplate for the electrical outlet.
The first step is to re-attach the new outlet’s receptacle and use pliers to reconnect the ground and “C” wires from the outlet. Finally, push the receptacle back into the wall and screw the new faceplate before enabling the power.
Note: Do not reactivate the power before the new faceplate is attached securely!
Let's Wrap Up:
The primary sign of a defective outlet is discoloring of the faceplate, burnt spots or smell of carbon monoxide. You should also watch out for flickering lights produced by the electrical poles of the outlet.
Related Articles:
- How to Tell if Charging Cable is Good for Gaming?
- Why is Lenovo Legion Go Not Charging? (The Fixes You NEED!)
- ASUS ROG Ally Not Charging – 6 Easy Ways to Fix
- PlayStation Portal Not Charging – 8 Proven Solutions
- Oculus Quest 3 Not Charging While Playing? – (Easy Guide)
- Oculus Quest 3 Controllers Not Charging – Easy Ways to Fix


![[FIXED] Lenovo Legion Go Not Turning On - (7 Instant Solutions)](https://gamescopes.com/wp-content/uploads/2024/04/Lenovo-Legion-Go-Not-Turning-On-Featured-Featured-300x240.webp)