

If your Lenovo Legion Go not charging, stay until the end of this guide!
Navigation Table
Toggle
The handheld Lenovo console can develop charging issues for various reasons, including equipment faults, port obstruction, or even damaged system files. This guide will help you identify the cause of the problem and apply expert troubleshooting solutions to restore Legion Go’s charging capability.
If the Lenovo Legion Go is unable to charge, attempt a “Force” restart, inspect the charger’s connections, and alter the power source. If the fault persists, factory reset the console and rebuild the damaged system files.
If you’re facing other issues with your Lenovo Legion Go such as, not turning on or not reading SD card, we can help you with dedicated troubleshooting steps!
Why is My Lenovo Legion Go Not Charging?
Here are all the reasons why the Lenovo Legion Go is refusing to charge:
- Unsecured or loose A/C charger connections.
- A malfunction of the console’s charging setup.
- An issue with the power button of the Legion.
- Insufficient power source of the Legion device.
- A malfunction with the Legion Go’s hardware.
Proceed with the guide to uncover reliable solutions for Legion Go’s charging issues!
Lenovo Legion Go Not Charging - Here’s How to Fix
Tip: Follow the steps chronologically!
1. Force-Start Your Legion Go
You can address existing startup issues with the Legion Go by “jump” starting the console’s system. To achieve a “force” start-up of the console, the “Power” button on the outer periphery must be pressed and held for long enough until the display illuminates.
Here are the exact instructions to “force” start the Lenovo Legion Go easily:
- Connect the Legion Go handheld console to the USB-C charger.
- Locate the “Power” button on the outer surface of the Legion Go.
- Hold the “Power” button for 10-15 seconds and unplug the USB-C.
- Wait for 30 seconds and reconnect the Legion Go to the charger.
- Press the “Power” button for 3 seconds to start up the console.
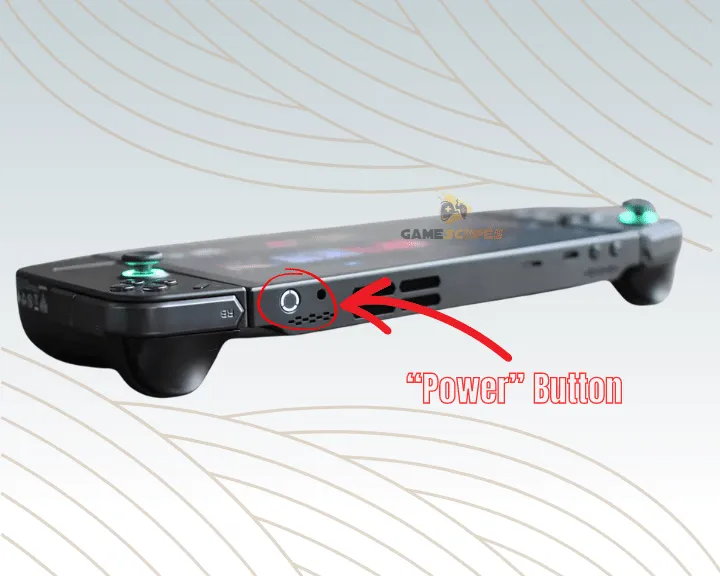
Check the Power Button for Obstructions!
The charging process may be interrupted consistently if the console powers on and off repeatedly. In most cases, constant reboots are caused by an underlying malfunction of the power button as a result of debris or obstructions underneath the button’s contact pins.
Tip: You should seek assistance from Lenovo if the buttons on your Legion Go are stuck or do not press properly!
2. Inspect the Charger’s Connections
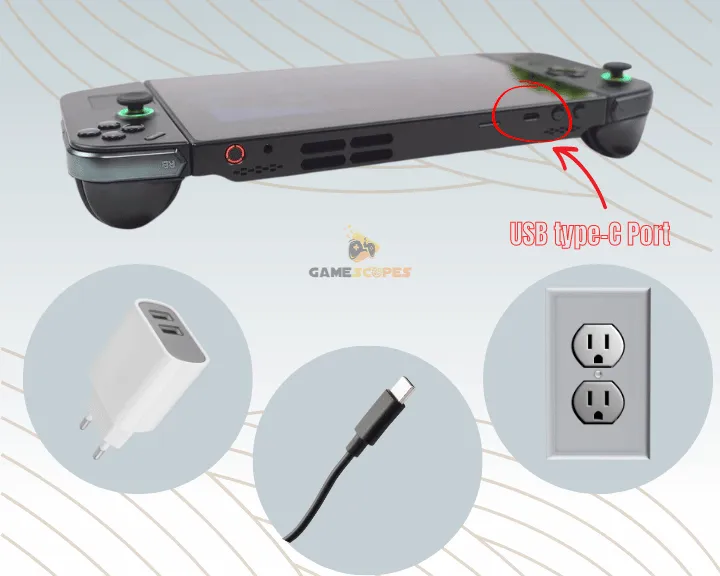
The Legion Go may be refusing to receive power due to unsecured connections of the console’s charging equipment. The next step is to inspect all connections of the charging equipment and eliminate loose or improper cable connections.
The Legion Go’s charging equipment consists of the following connections:
- The charging cable and power adapter connection.
- The charging cable and Legion Go port connection.
- The power adapter and A/C outlet cable connection.
If anywhere along the way the power gets interrupted, the console will not charge until further notice and may even enter “Hibernation” mode.
What’s “Hibernation” Mode On Legion Go?
Like many Lenovo products, the Legion Go is also shipped under “Hibernation” mode. This state prevents the Legion Go from recognizing the presses of the “Power” button before connecting with a charger for the first time.
Note: There will be no visual signs if the Lenovo Legion Go has entered “Hibernation” mode!
3. Inspect the Legion’s Charging Port
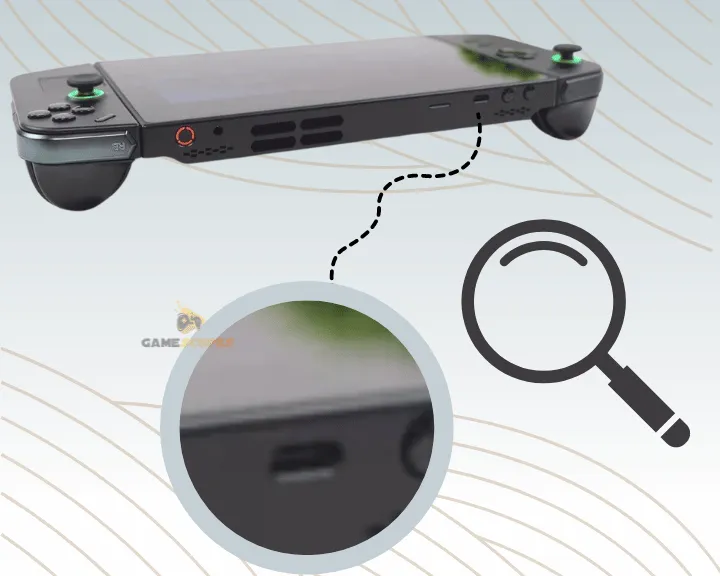
Another reason why the Lenovo Legion Go won’t charge is due to an obstruction of the charging port. So, the next step is to inspect the USB-C charging port on the console and ensure there is no dust accumulations, particles, or other obstructions, pushing the charging cable out.
Here are the steps to conduct complete maintenance of the Legion Go’s charging port!
- Use Compressed Air
The first step is to use a can of compressed air to blow out hardened debris on the electrical poles or the walls of the charging port surface. Do not use a high setting of blowing, instead, focus on removing the hardened debris within the port.
- Use Toothpick or Clip
Next, you can use a toothpick or paperclip to insert it into the charging port and carefully clean the contact poles. You should be extremely cautious to avoid damaging the poles as this could send in the Legion Go for factory repairs!
Tip: Use a toothbrush to clean the charging port’s outer periphery on the console!
4. Alter the Legion’s Charging Source
The next solution for potential issues with the Legion Go charging is altering the power source delivering electricity to the handheld console. Even if the charger is in perfect condition, power insufficiency caused by the electrical outlet will prevent the device’s battery from refilling. So, unplug and relocate the charging setup of the Legion Go into an alternative outlet and attempt to re-charge the console again.

Finding out whether the electrical outlet is bad or not requires some testing!
You can either hook up any low-voltage electrical appliance or use your phone’s charger to find out if there’s current in the outlet.
Check if There’s an Outlet Switch:
Most modern electrical outlets have a built-in power switch that enables or disables the current of the electrical poles. If the outlet doesn’t seem to charge to all or shows no indication of functionality, check if there’s a power switch on the side of the faceplate.
Note: The power controller is typically installed into the outlet’s faceplate.
5. Enter & Exit “Safe Mode” On Legion Go
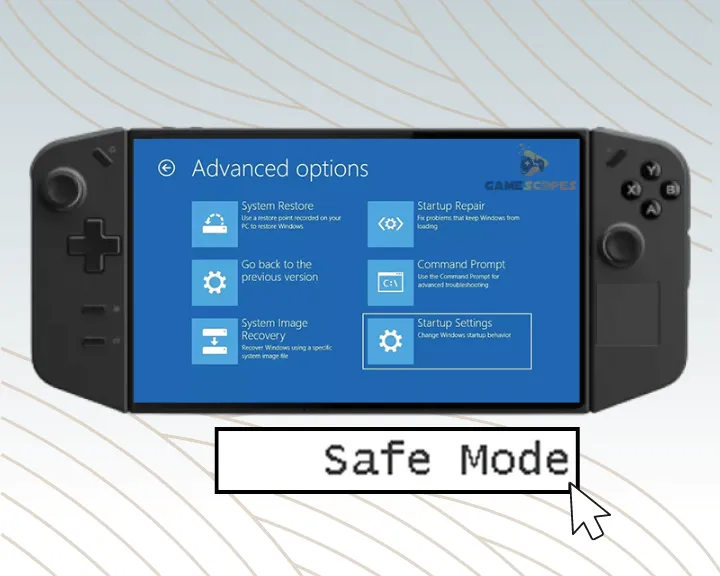
If the Legion Go’s charging fault is still there, the next step is to enter “Safe Mode” on the console’s Windows and re-attempt to charge. If the fault is caused by an improper system or file integrity, the Legion should be capable of charging while under the “Safe Mode” function.
Here’s how to enter “Safe Mode” on the Lenovo Legion Go:
- First, power off the Legion Go and wait until the display goes blank.
- Press the “Power” button on the Legion and press “F8” repeatedly.
- Once at the “Advanced Boot Options” highlight the “Safe Mode” tile.
Alternatively, you can use a Windows recovery drive or set up an installation media to boot under the “Recovery” environment if “F8” doesn’t work.
How to Start Lenovo Legion Go In “Recovery”?
To access the “Recovery” screen, hold or activate the “Shift” function and select the “Restart” option in the Windows power menu. The console should automatically boot under the “Recovery” screen, allowing you to pick from “Continue,” “Troubleshoot” or “Turn off your PC.”
Here’s how to boot in “Safe” mode from the “Recovery” menu:
- Click on the “Troubleshoot” tab from the “Recovery” menu.
- Navigate to “Advanced” and choose “Startup Settings.”
- Choose “Restart” and wait until the Legion Go reboots properly.
Now, the Legion Go will start under “Safe Mode,” allowing you to make changes and adjust settings while the device is offline. If the console boots successfully, you can exit the “Safe Mode” by rebooting the Legion Go!
6. Replace Your Charging Equipment
A reliable solution if the Lenovo Legion Go charger not working is to replace the equipment used in the console’s charging setup. By default, the charger consists of a USB type-C cord and a 12W-24W power adapter for quick and sufficient charging.
Let’s learn how to identify faults with the Legion Go’s charging equipment!
How to Test with a Replacement USB Cord?
To determine if the USB-C cable causes the fault, install a brand-new charging cable with the adapter and connect it to the handheld console. Check if any of the LED lamps on the Legion Go will go off or if there will be visual charging indications.
How to Test with a Replacement Power Cord?
If the console is refusing to charge with a brand new cord, install a replacement high-voltage power adapter with the existing USB-C. Double-check if all connections are secured and plug the charger into the port on the Legion Go.
Note: The power controller is typically installed into the outlet’s faceplate.
7. Access the “System File Checker” (SFC)
Potential charging issues may occur as a result of system file corruption in the Windows installation directory of the Legion Go. You can repair damaged or corrupted files using the “System File Checker” service accessible on the legion Go through the CMD (Command Prompt.)
Here’s how to access the System File Checker on the Legion and check for bad files:
- Open “Start” and type “CMD” or “Command Prompt” in the field.
- Right-click on the “Command Prompt” result from the start menu.
- Select the “Run as administrator” function to open the window.
- Next, type “sfc /scannow” and press “Enter” to start the function.
- Wait until the Legion Go’s system has finalized the file check.

The process’s longevity is based on the size of the damage inflicted to the Legion Go’s file integrity. In some cases, the file check and verification may last for up to 10 minutes.
Warning: Do not power off or unplug the Legion Go from the charger during the check!
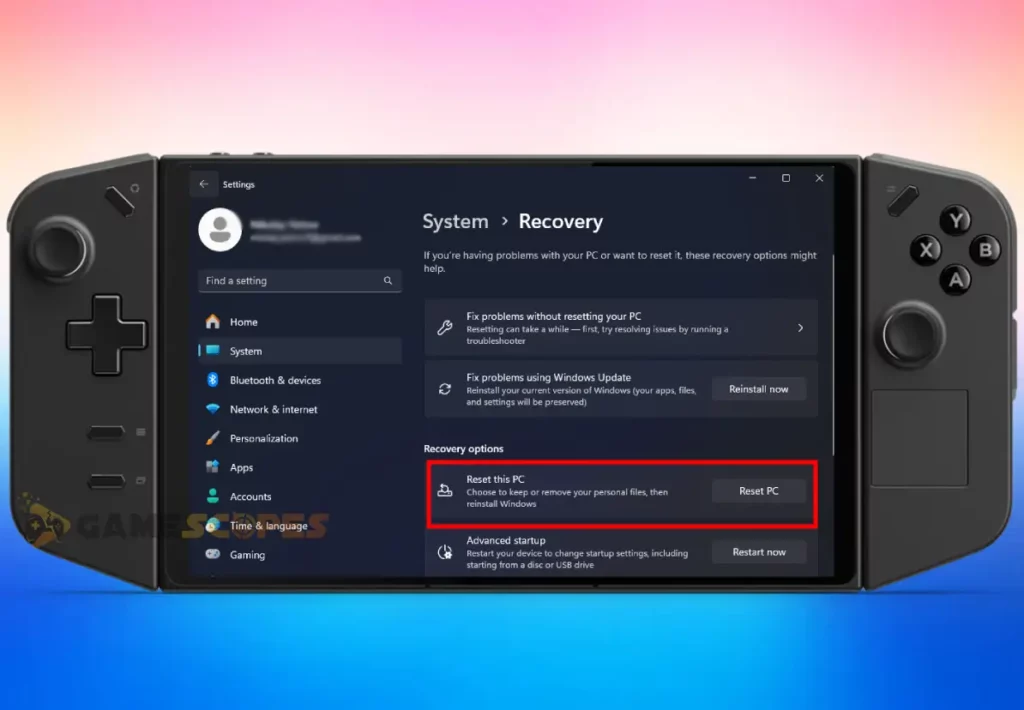
8. Factory Reset the Lenovo Legion Go
Like any other Windows OS-compatible PC, the Legion Go can be reset through Windows’s “Recovery” settings. It is a quick and easy way to eliminate issues with the charging process or underlying malfunctions of the console’s software.
The Legion Go requires at least 15-20% of battery to start and finalize the reset!
Here’s how to begin a factory reset on the Legion Go easily:
- Select “Start” to access the Windows start menu.
- Type “Settings” and press enter to open the page.
- Head to “System” and open the “Recovery” menu.
- Choose “Reset PC” next to the “Reset this PC’ label.
- Follow the on-screen instructions to reset the Legion.
How to Reset Legion Go Without Losing Files?
If you wish to keep most of your user files after the reset, you can reset the Windows by creating a backup. For this purpose, you either need a cloud or local storage to back up the Windows.
Here’s how to start a reset on the Legion Go and keep all files:
- Go to “Start” and access “Settings” → “Update & Security.”
- Go to “Recovery” and press “Reset this PC” → “Get Started.”
- Next, select “Keep my files” and choose “Cloud” or “Local.”
For backing up files locally, the system requires an external drive that does not have any content installed on it. You may even use a flash drive if it has enough storage to backup the Legion Go’s system.
Note: The Lenovo Legion Go will power off multiple times during the reset!
Wrapping Up:
If the Lenovo Legion Go not charging, inspect the charger’s connections, try with a different charging equipment, and run the “SFC” (System File Checker.) If the fault continues, alter the power source of the console and force a factory reset on the Windows.
Related Articles: